Why Proper Dogwood Trimming Matters
Trimming a dogwood tree is a task that requires careful timing and technique to maintain its health and iconic flowering beauty. For homeowners seeking quick guidance:
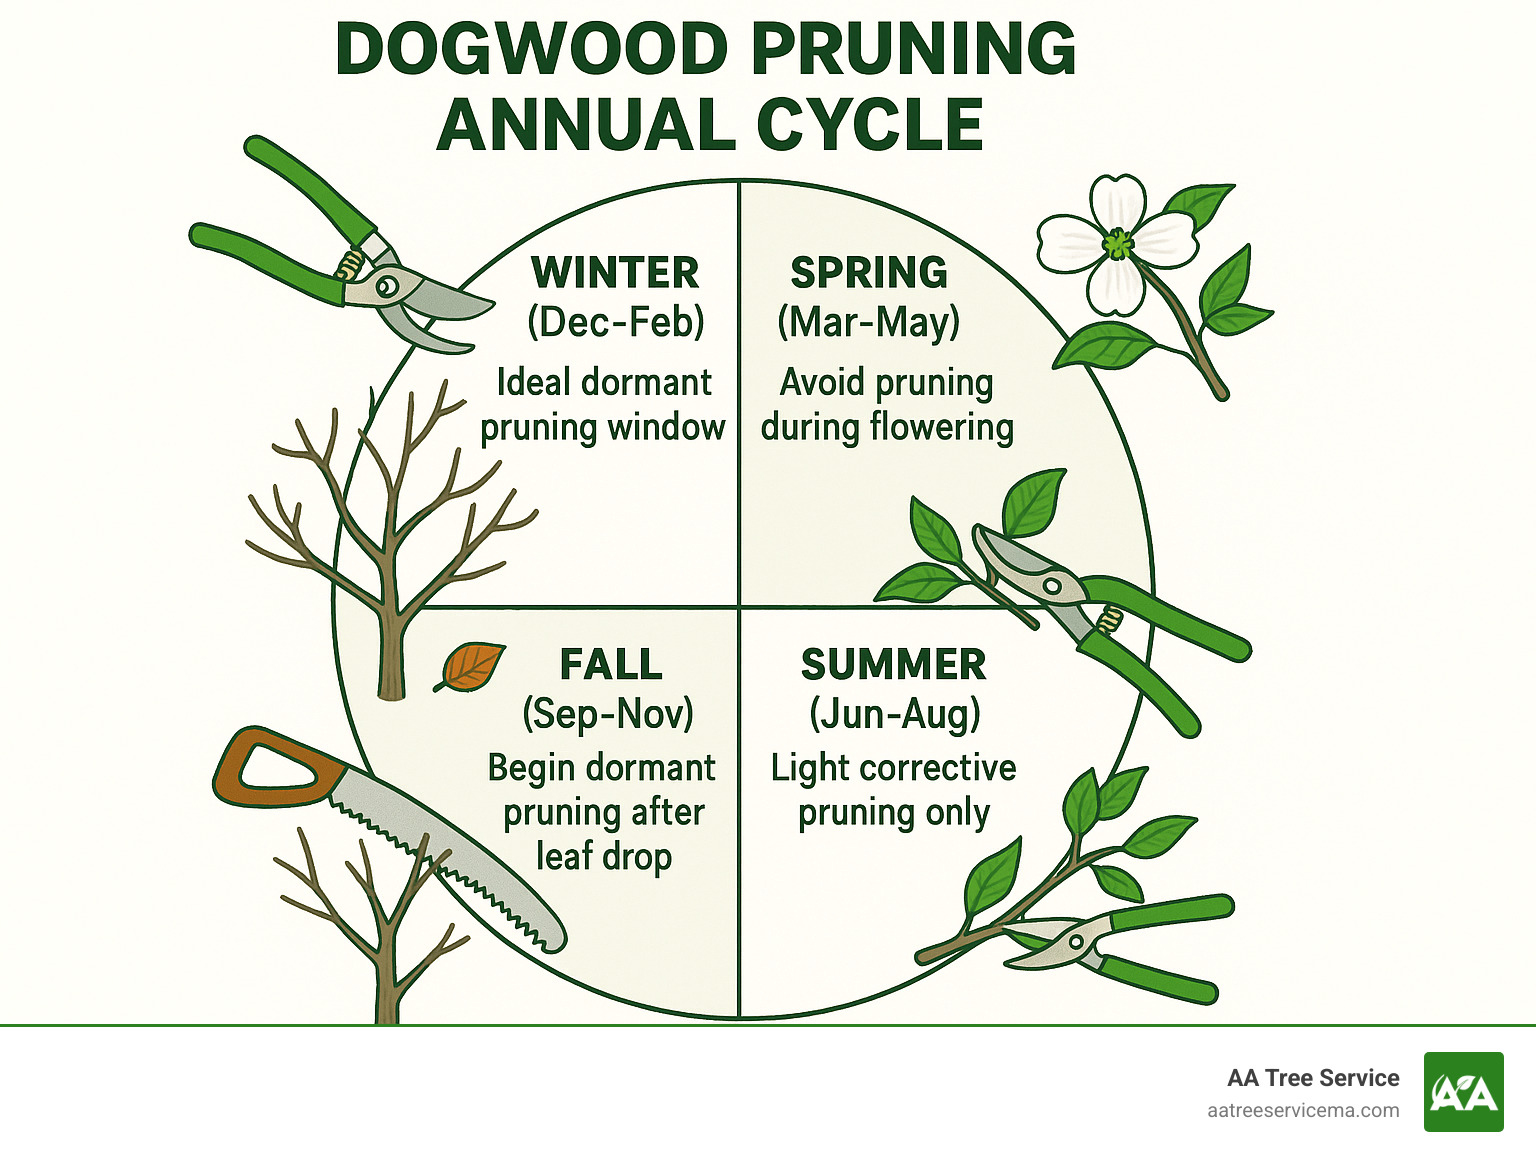
- Best time: Late fall to winter (dormant season)
- How much: Remove no more than 15-20% of living canopy annually
- Main goals: Remove dead/diseased branches, improve airflow, control size
- Never do: Top the tree, make flush cuts, or prune during spring flowering
- Tools needed: Bypass pruners, loppers, pruning saw, disinfectant solution
Flowering dogwoods are among the most beloved ornamental trees in Massachusetts and New Hampshire landscapes, prized for their spectacular spring blooms, attractive branching patterns, and vibrant fall color. However, many homeowners unintentionally damage these graceful trees through improper pruning techniques.
“Dogwoods hold their shape well independently, making maintenance pruning fairly simple,” notes one expert source. This is good news for homeowners, as dogwoods generally don’t require intensive pruning compared to other landscape trees. In fact, most experts recommend pruning only every second or third year unless you’re removing dead or diseased wood.
The key to successful dogwood maintenance lies in understanding that these trees have a remarkably small “pruning budget” compared to other species. While many trees can tolerate removal of up to 30% of their canopy, dogwoods should have no more than 15-20% removed in a single year to prevent stress and excessive watersprout regrowth.
Timing is equally critical. Pruning during spring disrupts bloom development and can expose the tree to dogwood borer, a serious pest that targets fresh wounds. The best approach is to prune during late fall or winter when the tree is dormant, which minimizes sap bleeding and reduces the risk of disease and pest problems.
For New England dogwood owners, understanding these basics will help preserve your tree’s natural grace while ensuring its continued health in our sometimes challenging climate.
Easy trimming a dogwood tree glossary:
– dogwood bush pruning
– tree pruning services
Understanding Why & When to Prune Dogwoods
Your dogwood naturally grows into a beautiful shape all on its own, but there are still compelling reasons to give it a little help with thoughtful pruning. Think of it as gentle guidance rather than a complete makeover.
First and foremost, pruning maintains your tree’s health by removing what arborists call the “3 Ds” – dead, diseased, and damaged branches. These troubled areas can become entry points for pests and diseases if left unchecked. When you remove them, you’re essentially closing the door on potential problems before they spread throughout your beautiful tree.
Improved air circulation is another major benefit of strategic pruning. By thinning dense areas, you reduce humidity within the canopy – a simple step that dramatically decreases the risk of fungal diseases like anthracnose, which can be particularly devastating to dogwoods in our Massachusetts and New Hampshire climate.
“A dogwood’s natural vase shape is one of its most charming qualities,” notes a regional expert. “Good pruning preserves this shape while addressing any structural issues.” This includes removing branches that cross or rub against each other, which can create wounds and invite problems.
While you’ll never want to drastically reduce your dogwood’s size, modest pruning can help keep it proportional to its surroundings – especially important if your tree grows near your home or utility lines. As a bonus, this strategic pruning often improves flowering in subsequent seasons by directing energy to the remaining branches.
When You SHOULD Avoid Trimming a Dogwood Tree
Timing is everything when it comes to trimming a dogwood tree. There are several situations when you should definitely put those pruners away:
During spring flowering is perhaps the most important time to resist the urge to prune. Not only will you sacrifice those gorgeous blooms everyone loves, but you’ll also disrupt the tree’s energy balance right when it needs it most.
Active sap flow periods are also problematic. When dogwoods are pushing out new growth, they tend to “bleed” sap profusely when cut. While not necessarily fatal, this bleeding can attract unwanted pests and increase disease risk.
Hot, humid weather creates perfect conditions for fungal infections to take hold in fresh cuts. Similarly, trees experiencing drought stress have limited resources for healing wounds, so it’s best to wait until normal moisture conditions return.
Finally, be patient with newly planted dogwoods. They need all their foliage during that critical first year to establish a strong root system. Wait until the second winter after planting before doing any significant pruning.
The Pruning “Budget” Rule
Think of your dogwood as having a limited “pruning budget” – take too much, and you’ll pay penalties in the form of tree stress and problematic regrowth. While many landscape trees can handle losing 20-30% of their canopy in a single year, dogwoods are notably more sensitive.
For these special trees, experts recommend removing no more than 15-20% of the living foliage in a single pruning session. Some specialists suggest an even more conservative approach of just 1/8 to 1/16 of the canopy for particularly sensitive varieties.
Why such strict limits? Dogwoods respond to aggressive pruning by producing numerous watersprouts – those thin, vertical shoots that emerge from larger branches. These watersprouts grow rapidly but have weak attachments, disrupt the tree’s natural form, and ultimately create more work for you in the future.
| Correct Pruning (15-20%) | Over-Pruning (>20%) |
|---|---|
| Maintains natural shape | Disrupts tree architecture |
| Minimal watersprout production | Excessive watersprout growth |
| Steady, controlled growth | Stressed, erratic growth |
| Consistent flowering | Reduced or delayed flowering |
| Maintains tree vigor | Weakens tree, increasing susceptibility to disease |
For severely overgrown dogwoods, patience is key. Rather than attempting a dramatic one-time renovation, consider a multi-year rejuvenation plan. By spreading the work over 3-5 years, you allow your tree to adjust gradually without the shock of major canopy reduction.
The best time for trimming a dogwood tree is during dormancy, typically from November through February in Massachusetts and New Hampshire. This winter pruning reduces stress on the tree, minimizes sap bleeding, and makes it easier to see the branch structure without leaves in the way. If summer pruning becomes necessary, wait until after flowering completes, usually in June.
Most dogwoods only need significant pruning every 2-3 years. This spacing allows the tree to fully recover between sessions and prevents the cumulative stress that can occur with annual heavy pruning. For more detailed guidance on pruning timing, the research from Purdue Extension offers excellent scientific backing for these recommendations.
Essential Tools & Safety Prep
Getting ready for trimming a dogwood tree starts with having the right equipment on hand. Think of it as preparing for a surgical procedure – your tools should be clean, sharp, and appropriate for the job.
Let’s talk about what you’ll need in your pruning toolkit. For those pencil-thin branches (up to ½ inch), a quality pair of bypass pruners will be your best friend. These make those clean, crisp cuts that heal quickly without crushing the stem. When branches get a bit thicker (½ to 1 inch), reach for your loppers – those long-handled cutting tools that give you the leverage needed for medium-sized branches.
For anything larger than an inch in diameter, don’t try to force it with smaller tools. A good pruning saw is essential for these bigger cuts. Many homeowners in Massachusetts and New Hampshire find folding saws particularly convenient and safer to carry around the yard.
“I was trying to use my loppers on everything until I finally invested in a proper pruning saw,” shares one local gardener. “What a difference it made – cleaner cuts and much less strain on my hands!”
Need to reach those higher branches without wobbling on a ladder? A pole pruner or pole saw can be a game-changer, especially since dogwoods can stretch up to 25 feet tall in our New England climate.
Don’t forget about sanitizing your tools! A simple mixture of one part bleach to three parts water works wonderfully. If you’re concerned about bleach corroding your tools, 70% isopropyl alcohol is a gentler alternative that still kills those nasty pathogens.
Safety should never be an afterthought. Protect yourself with sturdy gloves to prevent scratches and blisters, safety glasses to shield your eyes from falling twigs and debris, and a hard hat if you’re tackling larger branches. When using a ladder, follow Massachusetts safety guidelines: have someone spot you, maintain three points of contact, avoid standing on those top two rungs, and always place your ladder on solid, level ground.
Before you make that first cut, take a moment to prepare your tools properly. Sharp edges make cleaner cuts that heal faster and put less strain on both you and your beloved dogwood. Oil those moving parts and remove any rust or sticky sap residue.
Following International Society of Arboriculture standards means disinfecting your tools before you start and between cuts when dealing with diseased branches. This simple step prevents spreading pathogens throughout your tree or to other plants in your yard.
For larger or mature dogwoods that need extensive pruning, don’t hesitate to call in the professionals. AA Tree Service has the specialized equipment and expertise to handle complex pruning needs safely and efficiently.
Choosing the Right Tool for Each Cut
Matching your tool to the branch size isn’t just about convenience – it’s about your tree’s health. Think of it like choosing the right knife in the kitchen – you wouldn’t use a bread knife to peel an apple!
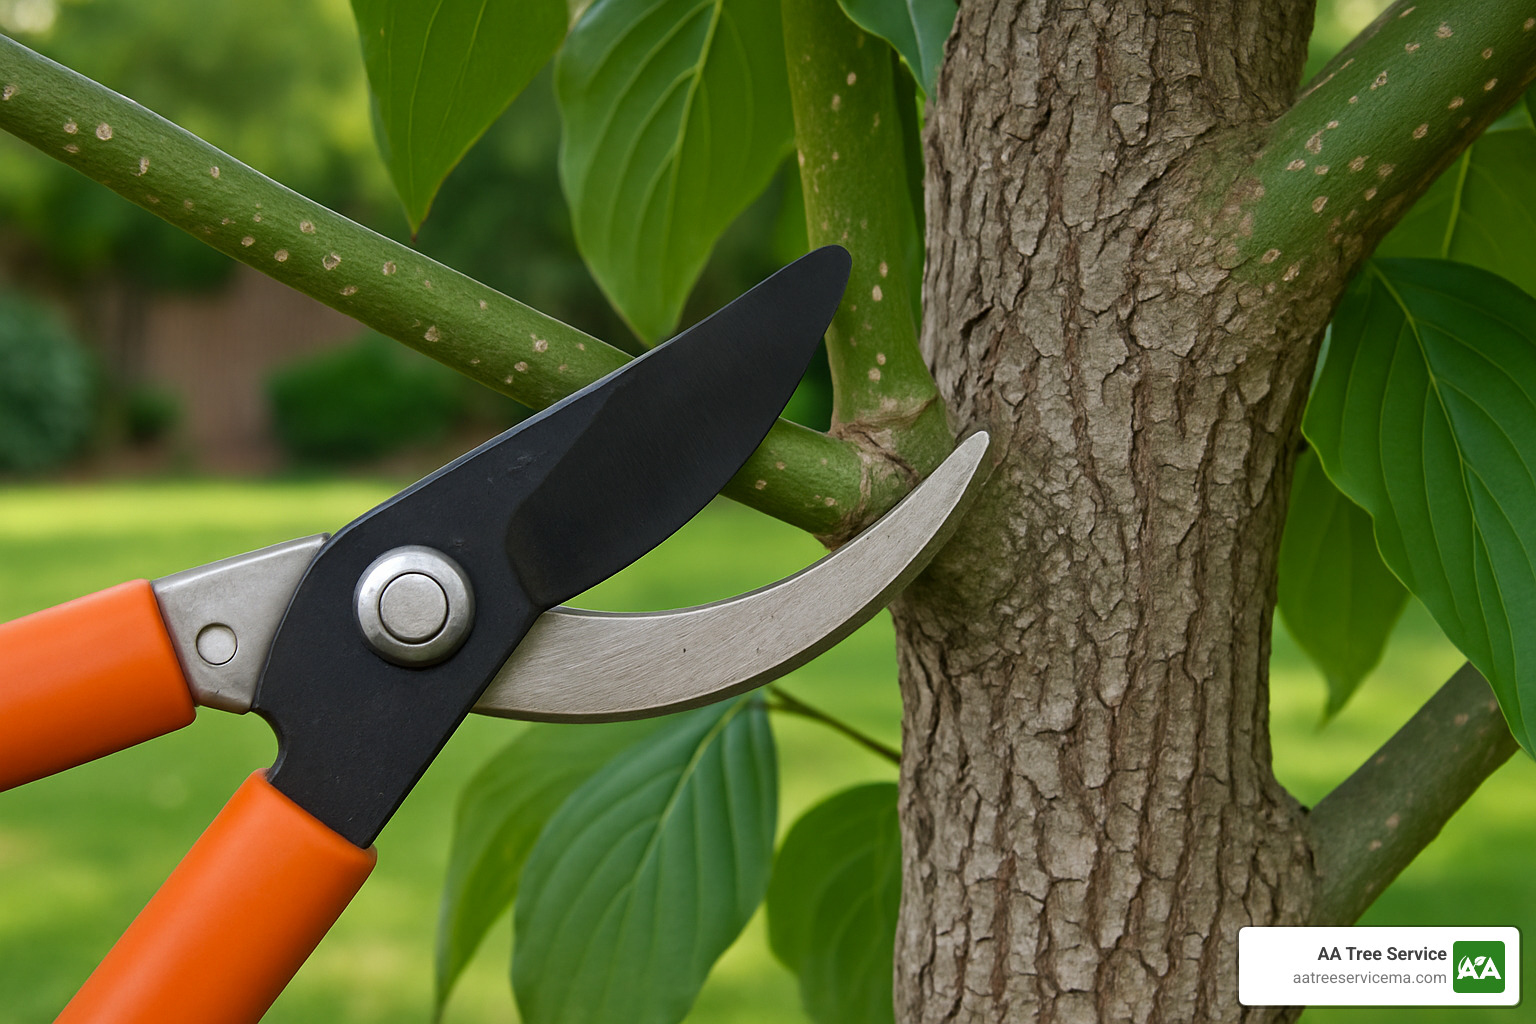
For those tender young shoots under ½ inch, your bypass pruners will make quick, clean work of the job. Always position the blade (not the anvil) facing the part of the branch you’re keeping to prevent crushing healthy tissue.
When you encounter those medium branches between ½ and 1 inch, your loppers provide the extra leverage needed for a clean cut. Again, position that blade toward the part you’re keeping for the healthiest results.
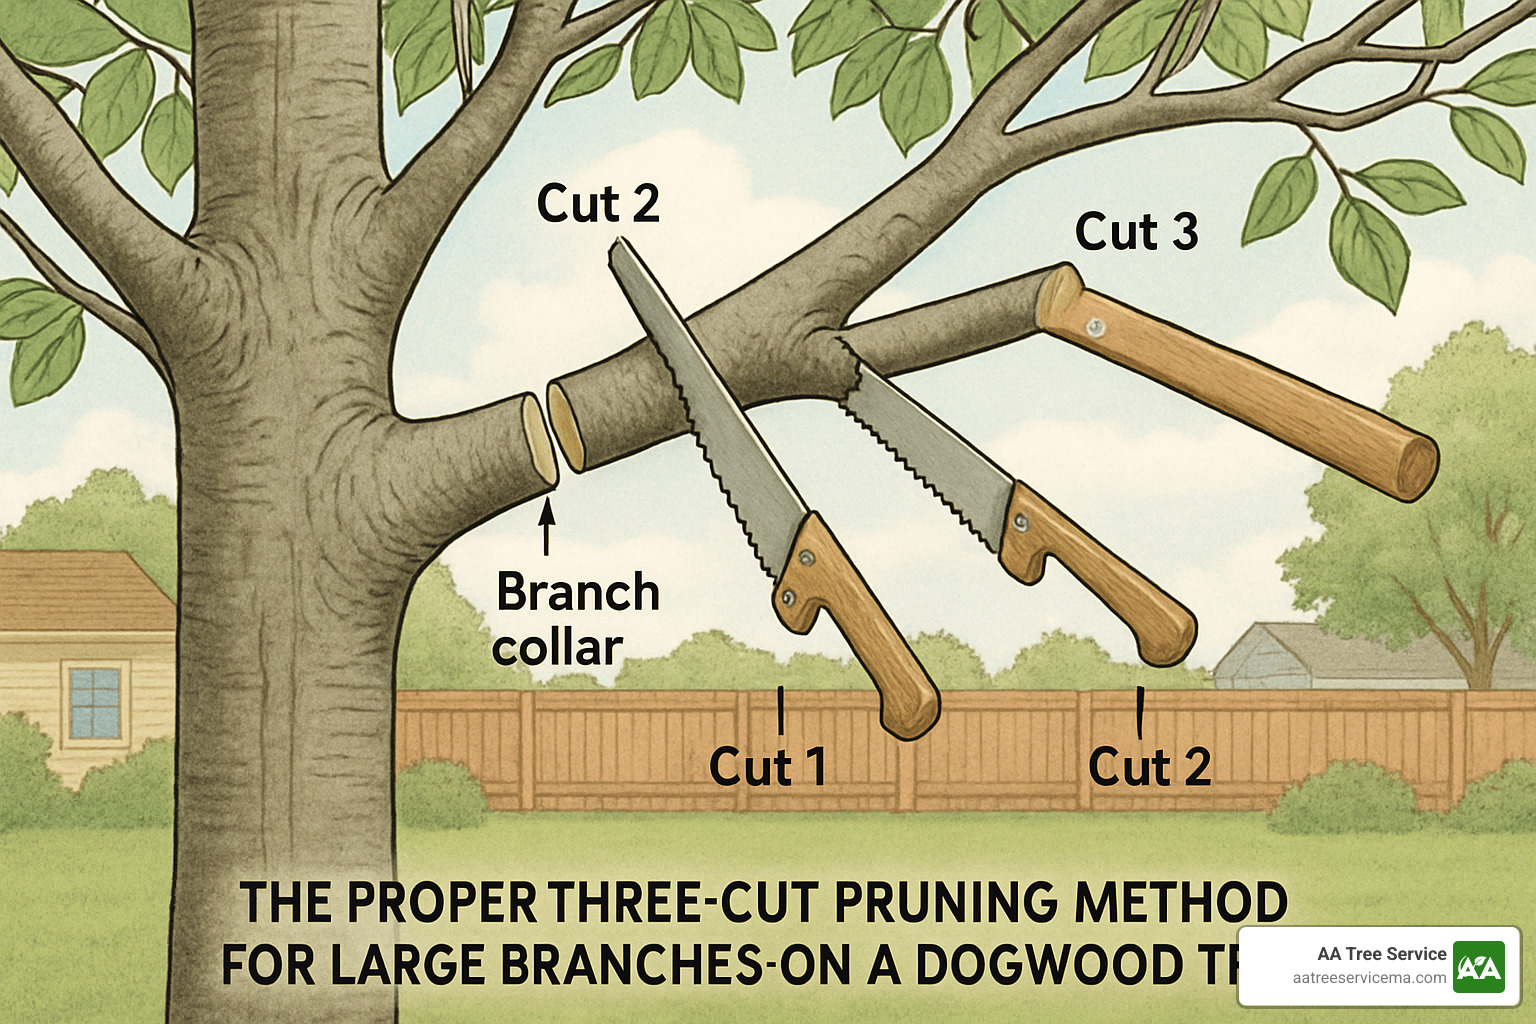
Tackling branches over 1 inch requires a different approach entirely. Here’s where your pruning saw comes into play, along with the essential three-cut method:
- Start with an undercut about 6-12 inches from the trunk, going about ⅓ of the way through
- Make your second cut from the top, slightly farther out from the first
- After the branch falls away safely, make your final precision cut just outside the branch collar (that swollen area where branch meets trunk)
This three-step approach prevents that dreaded bark tearing as the branch falls, which would create a larger wound that’s both harder to heal and more vulnerable to disease.
Despite what garden center products might suggest, research has consistently shown that wound sealants or tree paint are unnecessary and can actually interfere with your dogwood’s natural healing process. As one expert plainly states, “No wound dressing or sealer is needed—cuts heal naturally.” Your tree has evolved remarkable defense mechanisms that work best when we use proper cutting techniques and then step back.
Step-By-Step Guide to Trimming a Dogwood Tree
When trimming a dogwood tree, working systematically ensures you achieve the desired results without overpruning. Follow this inside-out approach:
- Begin with assessment: Stand back and examine the tree from all angles. Identify dead, diseased, or damaged branches, areas of dense growth, and any structural issues that need addressing.
- Remove the “3 Ds” first: Dead, diseased, and damaged branches should always be your first priority. These can be removed at any time of year without harming the tree.
- Thin from the inside out: Start in the interior of the tree and work your way outward. This approach maintains the tree’s natural vase-like shape while improving air circulation.
- Address crossing branches: When branches cross and rub against each other, they create wounds that invite disease. Remove the smaller or less ideally positioned of the two.
- Maintain a single leader: If multiple vertical stems are competing to be the central leader, select the strongest, most centrally located stem and remove or shorten the others.
- Remove suckers and water sprouts: These fast-growing vertical shoots from the base or along branches drain energy from the tree and disrupt its natural form.
- Preserve lower branches: Unlike some shade trees, dogwoods benefit from retaining their lower branches, which protect the trunk from sunscald and improve the display of upward-facing flowers.
- Make proper cuts: Always cut just beyond the branch collar (the swollen area where the branch meets the trunk or larger branch). Don’t leave stubs, but also avoid flush cuts that damage the collar.
- Step back frequently: Pause regularly to assess your work and ensure you’re maintaining balance and the tree’s natural form.
Dogwoods generally maintain an attractive shape on their own, so your goal is to improve rather than drastically alter their form. As one expert puts it, “Due to how they branch, flowering dogwoods are seldom improved by pruning of any consequence and can quickly be spoiled by it.”
Trimming a Dogwood Tree: Identifying & Removing the 3 Ds
The first priority when trimming a dogwood tree is addressing the “3 Ds”—dead, diseased, and damaged branches. Here’s how to identify and properly remove them:
Dead branches typically show:
– No leaves during growing season
– Brittle, dry wood that snaps easily
– Lack of flexible green cambium layer under bark
– Gray or brown color distinct from healthy branches
To check if a branch is dead, scratch the bark with your thumbnail or a knife. Living branches will reveal a green layer underneath, while dead branches will be dry and brown throughout.
Diseased branches may exhibit:
– Cankers (sunken, discolored areas on the bark)
– Unusual growths or swellings
– Fungal bodies (conks or mushroom-like growths)
– Discolored or spotted leaves
– Premature leaf drop
Dogwood anthracnose, a serious fungal disease, causes tan spots with purple borders on leaves, twig dieback, and cankers on the trunk and limbs. If you spot these symptoms, pruning affected areas promptly is essential.
Damaged branches include:
– Broken limbs from storms or mechanical injury
– Split or cracked branches
– Areas where bark has been torn or stripped
– Wounds from rubbing branches
When removing these problem branches:
- Sterilize your tools before each cut when dealing with diseased wood. A solution of one part bleach to three parts water works well, as does 70% isopropyl alcohol.
- Cut back to healthy wood, at least 6-8 inches below any visible disease symptoms.
- Make clean cuts at the branch collar, the swollen area where the branch meets the trunk or larger branch. Don’t leave stubs, which are entry points for disease.
- Dispose of diseased material properly by bagging and removing it from your property. Don’t compost diseased branches, as this can spread pathogens.
- Clean your tools thoroughly after completing the job, especially if you’ve been cutting diseased wood.
By addressing these problematic branches first, you’ll improve the tree’s health and make aesthetic decisions about further pruning easier.
Trimming a Dogwood Tree: Thinning for Light & Air
After removing dead, diseased, and damaged branches, the next step in trimming a dogwood tree is selective thinning to improve light penetration and air circulation. This helps reduce disease pressure and encourages healthier growth.
Focus on areas where branches are densely clustered, aiming for approximately 6 inches of space between parallel branches. This spacing allows adequate airflow while maintaining the tree’s natural form.
When thinning, follow these guidelines:
- Select the right branches to remove:
- Choose the weakest, thinnest branches in crowded areas
- Remove branches growing inward toward the center of the tree
- Eliminate branches growing downward or at odd angles
- Target younger branches rather than established ones
- Maintain balanced thinning:
- Work around the entire canopy, not just one side
- Stagger your cuts rather than removing all branches from one area
- Step back frequently to assess your progress
- Avoid “lion-tailing”:
- Don’t strip interior branches leaving foliage only at branch tips
- This common mistake creates poor branch structure and sun damage
- Maintain some interior branches and foliage for balance
- Make proper thinning cuts:
- Cut back to a lateral branch or the main trunk
- Always cut just outside the branch collar
- Angle cuts slightly to prevent water collection
The goal is not to drastically alter the tree’s appearance but to create small openings throughout the canopy. As one expert notes, “Opening the canopy through thinning improves air circulation and reduces disease risk.”
A properly thinned dogwood maintains its natural vase-like shape while allowing dappled light to reach the interior of the tree. This light penetration encourages interior growth and helps prevent branches from dying due to excessive shade.
Handling Large Limbs Safely
When trimming a dogwood tree that has larger branches (those over 2 inches in diameter), proper technique becomes even more critical for both tree health and personal safety. Large limbs are heavier and can cause significant damage if they fall uncontrolled.
The three-step cutting method is essential for safely removing larger branches:
- First cut (undercut): About 12-18 inches from the trunk, make an undercut that goes about one-third of the way through the branch from below. This prevents bark from tearing down the trunk when the branch falls.
- Second cut (top cut): Move 1-2 inches further out from the trunk than your first cut and cut downward until the branch breaks away. This controlled break protects the trunk from damage.
- Final cut (collar cut): After the bulk of the branch is removed, make your final cut just outside the branch collar (the swollen area where the branch meets the trunk). Never cut flush with the trunk, as this removes the tree’s natural healing tissue.
For branches that are particularly large or high in the tree, consider these additional safety measures:
- Use rope to lower branches: For controlled descent of heavy limbs, tie a rope around the branch before cutting and have a helper slowly lower it to the ground.
- Work in sections: For very large branches, remove smaller sections first to reduce weight before tackling the main portion.
- Secure your footing: Ensure your ladder is stable and positioned so you won’t need to overreach.
- Consider professional help: For branches larger than 3 inches in diameter or those requiring ladder work more than a few feet off the ground, hiring professionals like AA Tree Service can be the safest option.
Dogwoods rarely grow branches large enough to require extensive three-cut procedures, but when they do, proper technique is essential. As noted by experts, “Branches larger than 2 inches (5 cm) require careful multi-step cuts.” This careful approach prevents bark tearing, which creates larger wounds that heal slowly and invite disease.
Special Scenarios: Rejuvenation, Species Differences & Problem Branches
Sometimes you’ll encounter situations that go beyond routine maintenance when trimming a dogwood tree. These special cases require thoughtful approaches custom to the specific challenge at hand.
Rejuvenating an Overgrown Dogwood
If your beloved dogwood has been neglected for years, don’t worry – there’s still hope! Rather than attempting a dramatic one-time cutback (which could seriously stress or even kill your tree), implement a gentler three-year rejuvenation plan:
Year 1:
Begin by removing all dead, diseased, and damaged wood. Then, cut out approximately one-third of the oldest, largest stems at the base. This selective removal gives the tree room to breathe without shocking its system. Thin crowded areas to improve air circulation, which helps prevent disease. Afterward, apply a half-inch layer of compost under the canopy (keeping it several inches away from the trunk) and water deeply throughout the growing season to support recovery.
Year 2:
In the second dormant season, remove another third of the oldest remaining stems. You’ll likely notice healthy new growth responding to last year’s pruning – be careful not to remove this fresh growth. Thin any areas that have become crowded with new shoots and continue your regular deep watering schedule.
Year 3:
Complete the rejuvenation by removing the final third of original old stems. Now you can shape and thin as needed for balance, creating a tree that looks renewed rather than butchered. Apply another light layer of compost to support continued vigor.
This patient approach allows your dogwood to respond with healthy new growth while preventing the stress of excessive pruning. As one expert notes, “Dogwood is best pruned in late winter, prior to budbreak,” so schedule your rejuvenation efforts during the dormant season for best results.
For shrubby dogwood varieties grown primarily for their colorful stems (like red-twig dogwood), a more aggressive technique called coppicing can be effective. This involves cutting all stems to within 6-10 inches of the ground every 2-3 years to stimulate bright new growth. However, this approach is only appropriate for shrub dogwoods, not tree forms.
Species-Specific Tips
Different dogwood species have unique characteristics that affect how you should approach pruning:
Flowering Dogwood (Cornus florida) – Our beautiful native eastern species requires the most conservative approach. Limit pruning to no more than 15% of the canopy, as these trees are particularly susceptible to anthracnose disease and stress. Ensure excellent air circulation but retain those graceful lower branches, which protect the trunk from sunscald in our Massachusetts and New Hampshire winters.
Kousa Dogwood (Cornus kousa) – This Asian species has earned popularity for good reason. More disease-resistant than our native dogwood, it blooms later in spring (after the leaves emerge) and tolerates slightly more aggressive pruning. It can even handle summer pruning better than flowering dogwood if needed. As a bonus, it produces attractive raspberry-like fruit that adds fall interest.
Cornelian Cherry Dogwood (Cornus mas) – With its early-blooming yellow flowers and edible cherry-like fruit, this species offers unique benefits. You can prune after flowering if fruit production isn’t your goal. It responds well to renewal pruning when you need to maintain its size in a smaller landscape.
Red-twig/Yellow-twig Dogwoods (Cornus sericea, C. alba) – These shrub forms are grown primarily for their colorful winter stems. For the brightest color display, remove the oldest stems to ground level regularly, as the youngest stems provide the most vivid winter color. Some gardeners even coppice these (cut to ground) every 2-3 years for maximum stem color.
“Korean dogwood (C. kousa) is notably more disease resistant than other species,” making it an excellent choice for locations where dogwood anthracnose has been problematic in Massachusetts and New Hampshire landscapes.
For more detailed guidance on handling overgrown dogwoods, visit More info about Pruning Overgrown Dogwood Tree.
When dealing with storm-damaged limbs, utility line conflicts, or persistent root suckers, the same fundamental principles apply – make clean cuts, respect the tree’s natural form, and avoid removing too much living tissue at once. Your dogwood will reward your careful attention with years of spectacular blooms and healthy growth.
Post-Pruning Aftercare & Common Mistakes to Avoid
After trimming a dogwood tree, your work isn’t quite finished. Proper aftercare helps your dogwood recover quickly while minimizing stress. Think of it as nursing your patient back to health after surgery!
Start by giving your tree a deep, thorough watering. This helps ease the shock of losing branches and supports healing processes. Throughout the growing season, aim for at least an inch of water weekly, whether from rainfall or your garden hose. Dogwoods particularly appreciate consistent moisture during recovery.
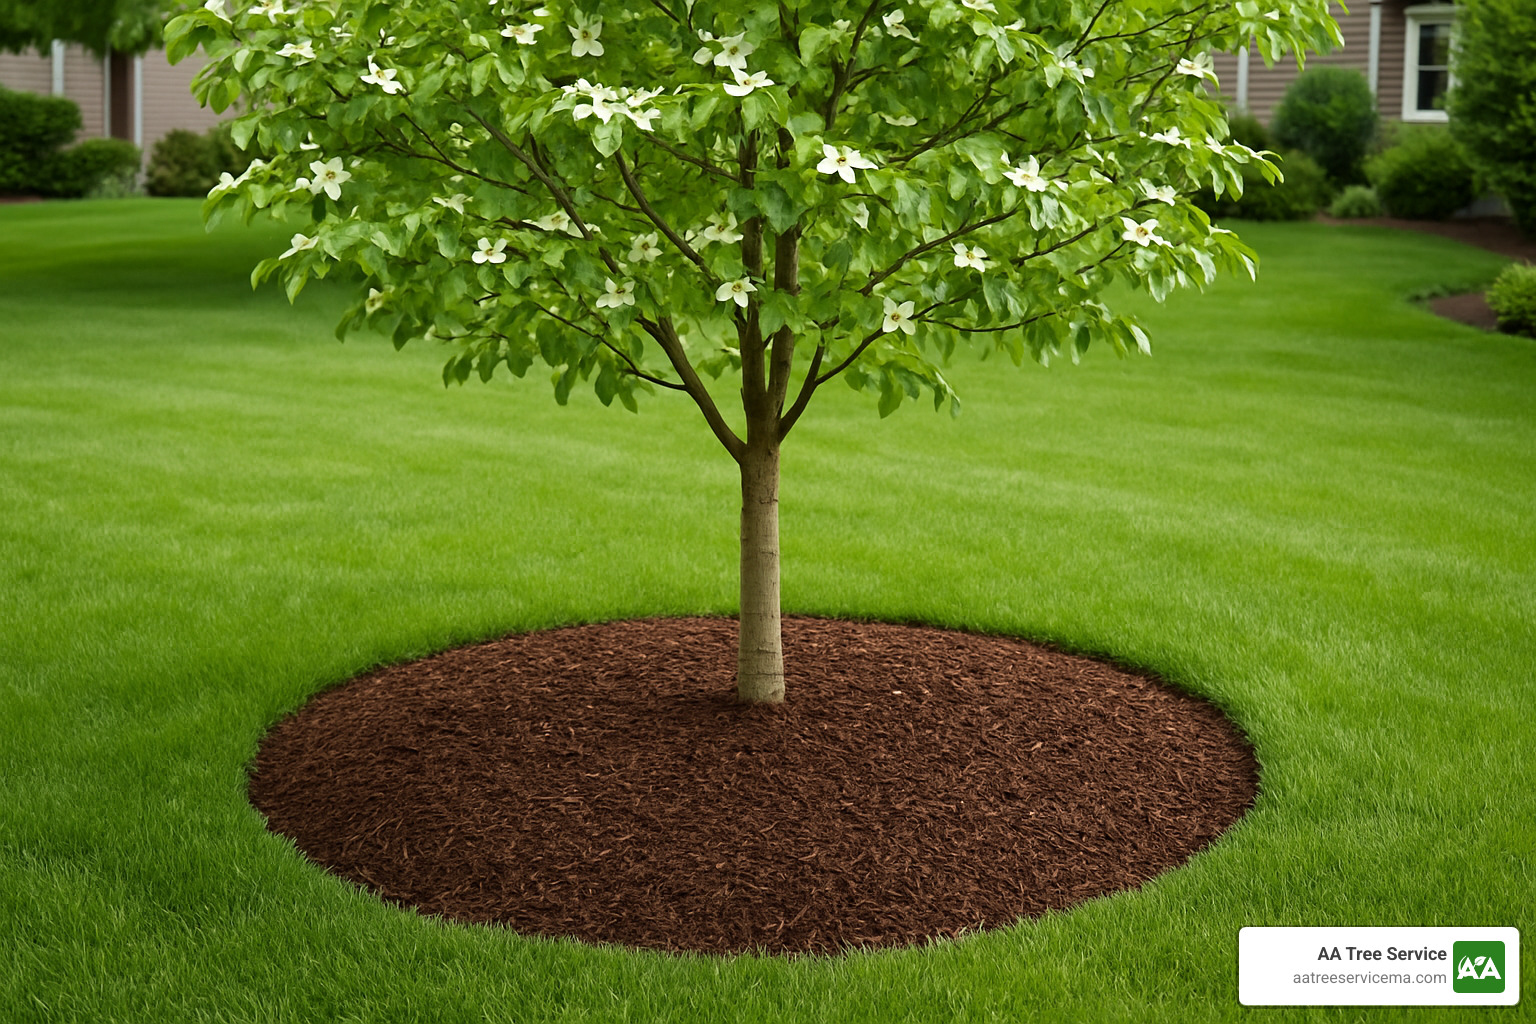
“The right mulching approach makes a huge difference,” says many experts. Create what gardeners affectionately call a “mulch donut” – a 2-3 inch layer of organic mulch extending to the drip line, but kept 2-3 inches away from the trunk itself. This conserves moisture and regulates soil temperature without causing trunk rot or creating a cozy home for rodents.
Keep a watchful eye for uninvited guests after pruning. Fresh cuts can attract boring insects, especially during the growing season in Massachusetts and New Hampshire. Check regularly for small holes, sawdust-like frass, or oozing sap – all potential signs of borer activity.
Despite what your grandparents might have told you, skip the wound paint! Modern research shows these products don’t help healing and might actually trap moisture and promote decay. Your dogwood has evolved natural healing mechanisms that work perfectly well without human intervention.
If your tree needs a nutritional boost, apply a balanced, slow-release fertilizer in early spring. Avoid late summer or fall fertilizing, which stimulates tender new growth that won’t have time to harden off before winter’s chill arrives.
Those vigorous vertical shoots that often appear after pruning? Those are watersprouts, and they’re essentially your tree’s panic response. Remove them promptly to prevent them from stealing energy from established branches.
Signs You Over-Pruned & How to Respond
We all make mistakes, and sometimes enthusiasm gets the better of us when trimming a dogwood tree. Here’s how to recognize if you’ve gone too far:
Excessive watersprouts are the most obvious red flag – when your tree sprouts numerous vertical shoots from cut areas, it’s essentially trying to replace lost foliage as quickly as possible. Leaf scorch or sunburn might appear as brown, crispy leaf edges or bark damage, especially on previously shaded areas now exposed to direct sun.
You might also notice fewer blooms the following spring, branches dying back further than where you cut them, or a general decline in your tree’s vigor – sparse foliage, stunted growth, or an overall unhealthy appearance.
If you spot these warning signs, first and most importantly: put down those pruners! Your tree needs time to recover before losing any more branches. Provide consistent care with deep watering during dry periods and proper mulching.
Don’t remove all those panic-induced watersprouts at once (which, ironically, triggers even more). Instead, selectively remove about half, focusing on the largest and most vertical ones. For severe sunscald cases, temporarily shading the south and west sides can prevent further damage.
Recovery takes patience – sometimes several years before your dogwood fully bounces back. For severely over-pruned trees, consider consulting with certified arborists like those at AA Tree Service, who can assess damage and develop a customized recovery plan.
Remember the wise gardening adage: “When in doubt, prune less rather than more.” This is especially true with sensitive beauties like dogwoods. As one expert perfectly summarizes, “Most gardeners overestimate how much they can prune; it’s better to be cautious.”
Frequently Asked Questions About Dogwood Pruning
Why is my dogwood bleeding sap after a cut?
That clear, sticky substance oozing from your freshly pruned dogwood isn’t cause for panic, though it certainly looks alarming! This phenomenon, sometimes called “slime flux,” happens when you prune during active growth periods when the tree’s vascular system is busy moving water and nutrients throughout the tree.
The good news is that sap bleeding itself won’t harm your dogwood. However, it does create some unwelcome side effects. The sweet, sticky sap can attract insects—particularly troublesome borers that might decide your tree looks like a perfect home. It can also create entry points for disease organisms and leave unsightly stains on your tree’s beautiful bark.
To keep sap bleeding to a minimum, timing is everything. Trimming a dogwood tree during winter dormancy (November through February in Massachusetts and New Hampshire) will virtually eliminate this issue. If you absolutely must prune during the growing season, expect some bleeding but know that it will resolve once the tree leafs out fully.
One important tip: never try to stop the bleeding by applying wound dressings or sealants. As experts consistently point out, “Bleeding sap isn’t dangerous on its own but should be minimized to reduce infection risk.” These products can actually trap moisture against the cut, potentially creating the perfect environment for decay organisms.
How much height can I safely reduce at once?
When it comes to making your dogwood shorter, patience is definitely a virtue. Unlike some landscape trees that bounce back from significant height reduction, dogwoods strongly object to dramatic haircuts.
For safe height management, follow the 15-20% rule—never remove more than this percentage of the total canopy in a single year. Instead of cutting straight across the top (a harmful practice called “topping”), prune to lateral branches that are growing in directions you prefer. This maintains the tree’s natural form while gently reducing its height.
Mature flowering dogwoods naturally reach 15-25 feet tall. If your space simply can’t accommodate a tree of this size, it might be better to consider replacing it with a naturally smaller species rather than fighting its genetics through constant pruning.
For dogwoods that have already grown much taller than desired, a gradual approach works best. Each year, selectively shorten the tallest branches by cutting back to appropriate lateral branches. This multi-year strategy keeps the tree healthy while slowly bringing it down to a more manageable size.
For particularly challenging situations with very tall, overgrown specimens, professional help is often the wisest choice. Certified arborists can assess your specific situation and create a thoughtful reduction plan that preserves both the tree’s health and its natural beauty.
Should I paint pruning wounds to stop disease?
Despite what your grandparents might have taught you about tree care, the answer is a clear and simple no. Modern arboricultural research has thoroughly debunked the once-common practice of painting or sealing pruning wounds on trees, including dogwoods.
These products, whether tar-based, asphalt, or latex paint, actually do more harm than good. Rather than protecting your tree, wound dressings can:
- Trap moisture against the cut surface, creating ideal conditions for decay
- Interfere with the tree’s natural healing processes
- Provide a false sense of security while doing nothing to prevent disease
- Sometimes even speed up the decay process they were meant to prevent
As noted by leading experts in the field, “Most arborists advise against using wound sealers” because “cuts heal naturally” through the tree’s own defensive mechanisms. Trees have evolved sophisticated systems—known as Compartmentalization Of Decay In Trees (CODIT)—to seal off wounds and prevent the spread of decay organisms.
Instead of reaching for wound paint, focus your energy on practices that actually help your dogwood heal:
- Make clean cuts with sharp tools just outside the branch collar
- Prune during dormant periods when possible
- Keep your cutting tools disinfected, especially between trees
- Provide proper aftercare through adequate watering and mulching
These simple steps will do far more to keep your dogwood healthy than any wound sealer ever could. Trust your tree’s natural healing abilities—they’ve been perfected over millions of years of evolution!
Conclusion
Trimming a dogwood tree isn’t just a maintenance task—it’s an investment in the future beauty and health of one of your landscape’s most precious assets. When you prune with care and knowledge, you’re setting the stage for spectacular spring blooms, vibrant fall color, and a naturally graceful silhouette that improves your property year-round.
As we’ve explored throughout this guide, successful dogwood pruning comes down to a few essential principles. The dormant season from late fall through winter offers the ideal window for most pruning work. Your dogwood will thank you for respecting its limited “pruning budget” of 15-20% of living canopy in a single year—a conservative approach that prevents stress and excessive regrowth.
Always begin with the fundamentals—removing dead, diseased, and damaged branches to promote overall tree health. Those clean cuts just outside the branch collar allow your dogwood to heal efficiently, while selective thinning improves air circulation without sacrificing the tree’s natural elegance. And don’t forget that quick wipe of disinfectant between cuts, especially when dealing with diseased wood—it’s a small step that provides significant protection.
For Massachusetts and New Hampshire homeowners, our regional climate presents specific challenges for dogwoods. From fungal diseases like anthracnose that thrive in our humid summers to dogwood borers that can devastate an already-stressed tree, proper pruning practices become even more crucial in our corner of New England.
While many dogwood pruning tasks fall well within the capabilities of a dedicated homeowner, there’s wisdom in recognizing when to call in professional help. Large branches, extensive rejuvenation work, or pruning that requires working at heights often warrants expert assistance. At AA Tree Service, our certified arborists bring decades of experience specifically custom to New England growing conditions, offering specialized knowledge of dogwood care throughout Massachusetts and New Hampshire.
Whether you’re maintaining a cherished landscape feature that’s graced your yard for generations or nursing a newly planted specimen toward its full potential, thoughtful pruning practices will help ensure your dogwood remains a stunning focal point for years to come.
For more information about our tree pruning and trimming services, or to schedule a consultation with one of our certified arborists, reach out to AA Tree Service today. Your dogwood deserves nothing less than expert care—and so do you.
