Why Drilling Holes in Tree Stumps is Essential for Removal
Drilling holes in tree stumps is the critical first step for effective stump removal, whether you’re using chemicals, burning, or accelerating natural decay. For homeowners in Massachusetts and New Hampshire facing unsightly stumps, here’s the quick answer:
Quick Guide: Drilling Holes in Tree Stumps
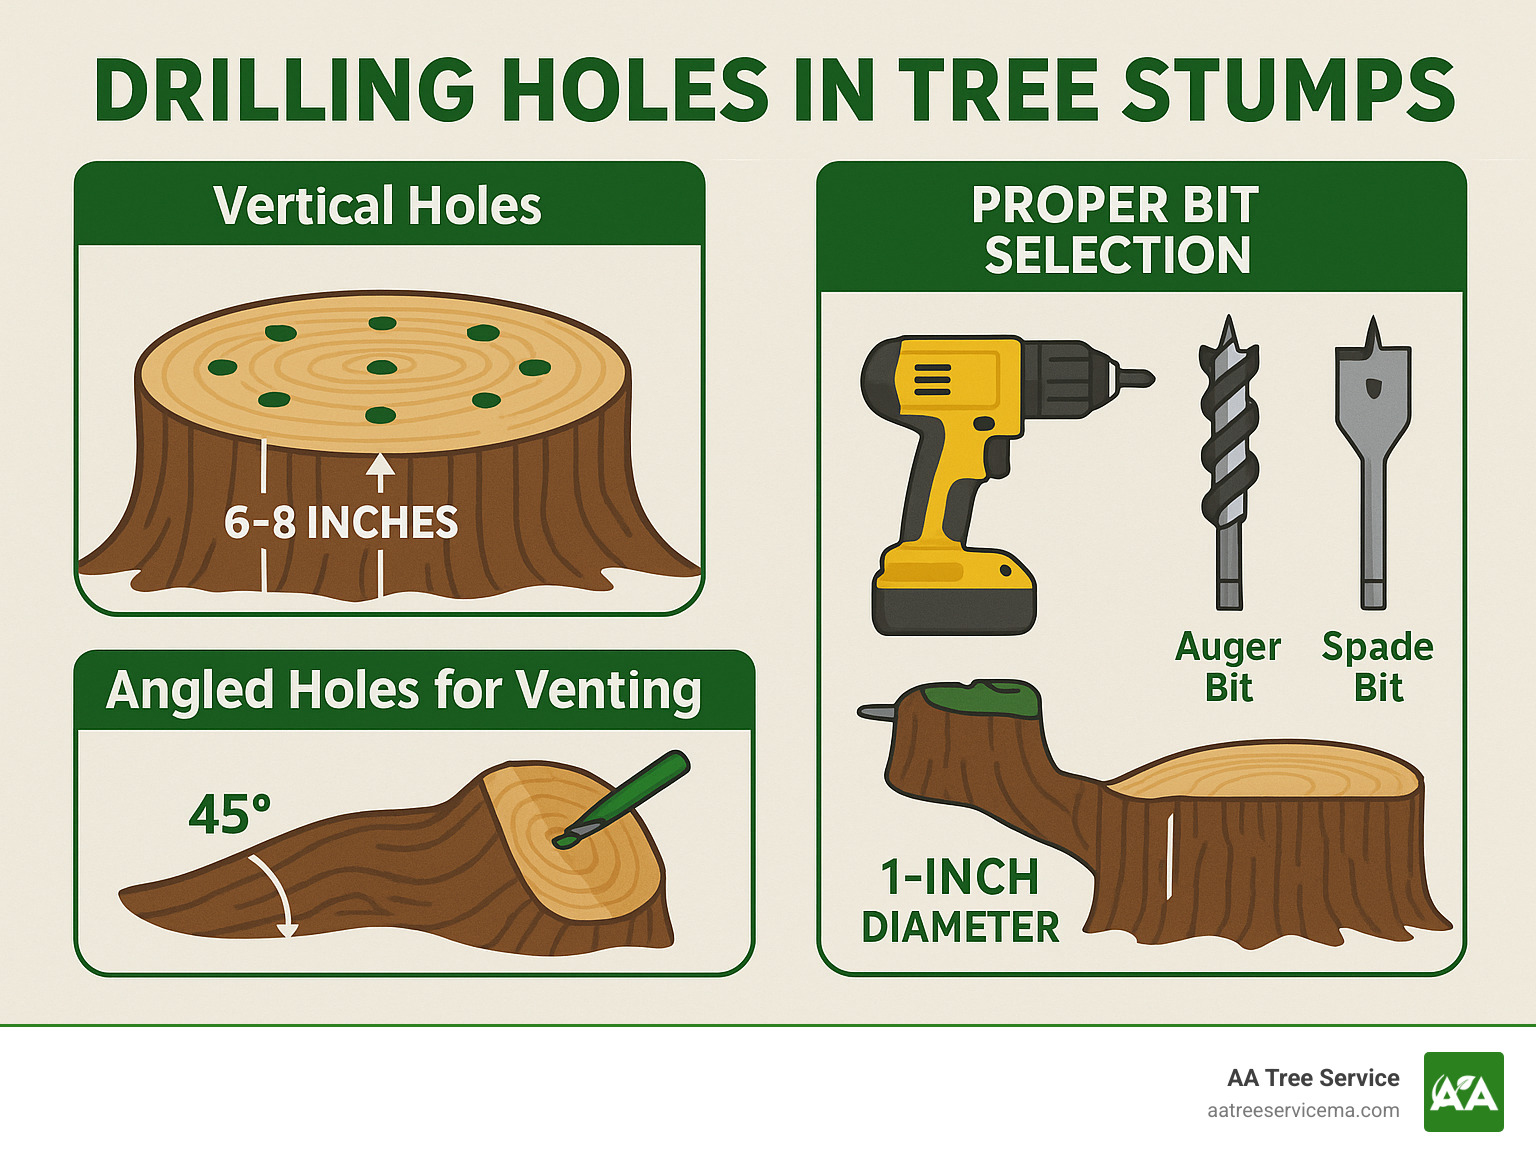
* Drill size needed: 1-inch diameter auger or spade bit
* Hole depth: 10-12 inches deep
* Spacing: Every 6-8 inches around perimeter
* Drill power: Minimum 800W corded or 18V high-torque cordless
* Pattern: Vertical holes plus 30-45° angled holes for venting
That old tree stump in your yard doesn’t have to be an eyesore or obstacle any longer. While professional stump grinding is always an option, many Massachusetts and New Hampshire homeowners prefer the satisfaction and cost savings of DIY stump removal. The process starts with properly drilling holes—a technique that creates pathways for chemicals, oxygen, or heat to penetrate the dense wood.
“I’ve only been able to drill one hole!” This common frustration, shared by a homeowner in our research, highlights why having the right tools and technique matters. Drilling into end grain (the top of a stump) is significantly more challenging than drilling across grain, and requires sufficient torque and sharp bits.
Whether you’re preparing to apply stump remover chemicals, create a controlled burn, or simply accelerate natural decomposition, properly drilled holes make all the difference between success and frustration. With the right approach, even stubborn oak or maple stumps that might seem impossible to penetrate can be effectively prepared for removal.
Drilling holes in tree stumps word roundup:
– natural stump dissolver
– local stump grinding
– natural stump removal
Why Drill Holes? Benefits & Smart Use Cases
That old stump in your yard isn’t just an eyesore—it’s an opportunity waiting for the right approach. When we talk to Massachusetts and New Hampshire homeowners about drilling holes in tree stumps, they’re often surprised at just how versatile this simple technique can be.
Think of drilling as the foundation for almost any DIY stump removal method. Those holes create pathways for nature, chemistry, or heat to do the hard work for you. After helping countless New England homeowners tackle stubborn stumps, we’ve seen how effective strategic drilling can be.
Drilling holes in tree stumps offers five key benefits that make it worth the effort:
When you drill holes, you’re creating deep pathways for stump removal chemicals to penetrate the dense wood fibers—something that surface application alone can’t achieve. Those same holes enable controlled burning by creating natural ventilation and fuel chambers if burning is your preferred method. For the patient homeowner, drilling significantly accelerates natural decomposition by increasing the surface area where beneficial fungi and microbes can access the wood.
Many creative Massachusetts homeowners have finded that strategic drilling can transform an eyesore into a beautiful garden feature like a planter or decorative element. As an added bonus, properly treated stumps are far less likely to become home to problematic pests like carpenter ants or termites that might eventually threaten your home.
Common Reasons Homeowners Choose Drilling
“I never thought I’d get rid of that maple stump until I tried drilling it,” a Lexington homeowner told us recently. His experience mirrors what we hear throughout Massachusetts and New Hampshire.
Most homeowners drill for chemical application, creating vertical reservoirs for potassium nitrate or other stump removers. These substances can transform a rock-hard stump into something spongy and easily removable in just 4-6 weeks—dramatically faster than the years natural decay would take.
In areas where burning is permitted (always check local regulations in your Massachusetts or New Hampshire town), drilling holes in tree stumps creates perfect chambers for fuel and oxygen flow. As one Nashua homeowner shared, “I read up on removing the stump, and burning it made the most sense for where it’s at.”
The creative types often drill to transform stumps into charming planters. Those initial holes create the starting point for hollowing out the center while preserving a natural wood rim. For environmentally-minded folks, especially those with wooded properties, strategic drilling creates perfect habitat spaces for beneficial insects and fungi, supporting local ecosystems while speeding up the stump’s return to soil.
Pros & Cons Versus Other Methods
Before you commit to drilling holes in tree stumps, it helps to understand how this approach stacks up against alternatives:
| Method | Pros | Cons | Cost Range | Time to Complete |
|---|---|---|---|---|
| Drilling + Chemicals | • Low equipment cost • Minimal physical effort • Can do other projects while working |
• Takes 4-6 weeks • Requires multiple applications • Chemical handling |
$10-$50 | 4-12 weeks |
| Drilling + Burning | • Relatively quick • Satisfying results • Minimal cost |
• Fire safety concerns • Local permit requirements • Constant monitoring |
$5-$20 | 1-3 days |
| Manual Digging | • No chemicals • Complete removal • No special tools |
• Extremely labor-intensive • Difficult with large stumps • Challenging root removal |
$0-$50 | 1-3 days |
| Stump Grinding | • Fast results • Complete removal • Professional finish |
• Equipment rental costs • Learning curve • Safety concerns |
$100-$400 (rental) | 2-4 hours |
| Professional Service | • No personal labor • Quick completion • Guaranteed results |
• Highest cost • Scheduling requirements • Access needs |
$175-$1,500 | 1-2 hours |
Note: These are average costs based on internet data and not actual costs for AA Tree Service.
The drilling approach shines for budget-conscious homeowners who aren’t in a rush. It requires minimal specialized equipment beyond a good drill and the right bits. While professional services offer immediate results, the satisfaction of handling it yourself—and the money saved—makes drilling an attractive option for many Massachusetts and New Hampshire homeowners with the patience to let chemistry or nature do the heavy lifting.
Tools & Gear for Drilling Holes in Tree Stumps
Successful drilling holes in tree stumps requires the right equipment. Many homeowners become frustrated when using underpowered drills or inappropriate bits. Here’s what you need:
Choosing the Best Drill & Bit Combo
When it comes to tackling those stubborn tree stumps in your Massachusetts or New Hampshire yard, your drill is your best friend—but not just any drill will do. You need serious power.
Corded electric drills offer consistent, reliable torque that won’t fade as you work. Look for models with at least 800W power rating. As one of our customers shared after successfully removing a maple stump, “A Black & Decker Industrial drill is a real beast for high-torque tasks.” The constant power supply means you won’t be left with a half-drilled stump when batteries die.
If you prefer the freedom of cordless drills, don’t skimp on power. Standard homeowner models simply won’t cut it. A Massachusetts customer learned this the hard way: “My standard Ryobi 18V cordless drill lacked the necessary power.” You’ll need professional-grade 18V or 20V brushless models with high-torque settings to make any real progress.
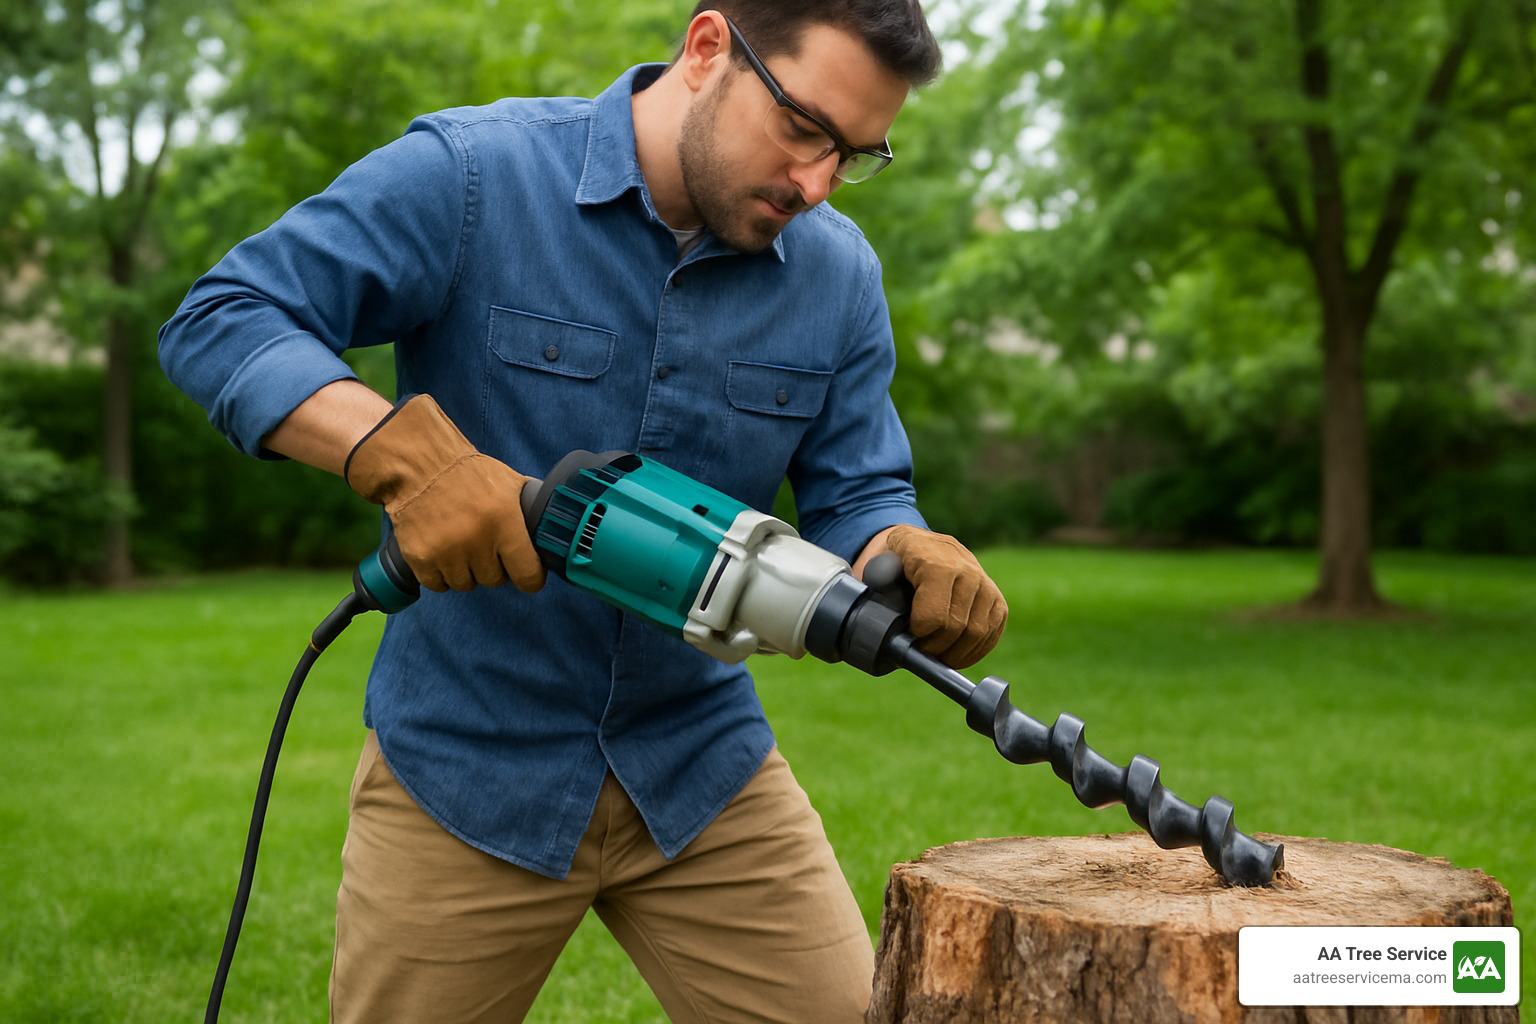
For tough stumps, especially hardwoods common in New England, consider a right-angle drill. Construction pros call these “Hole Hawgs” for good reason. They provide excellent leverage and, most importantly, protect your wrists when the bit inevitably binds. As one experienced user put it, “A right-angle drill won’t wrench your arm off when the bit binds.” For particularly stubborn stumps, mixer/joist drills deliver exceptional torque that can power through even the densest wood.
Your bit selection is equally important. Ship auger bits are the gold standard for stump drilling. Their long, spiral design with a screw tip pulls itself into the wood while efficiently clearing chips. Look for 1-inch diameter bits with 12-18 inch lengths for deep penetration.
For softer stumps or creating initial pilot holes, spade bits offer an affordable alternative. They’re great for getting started but may struggle with very deep holes. Standard auger bits strike a good balance between performance and cost but typically don’t have the length needed for proper stump treatment.
For most New Hampshire and Massachusetts homeowners, we’ve found the winning combination is a corded 800W drill or high-end 18V brushless cordless drill paired with a 1-inch ship auger bit. This setup provides the perfect balance of power, control, and effectiveness for most stump types in our region.
Safety Kit & Setup Checklist
Drilling holes in tree stumps is no lightweight task, and the power needed creates real safety concerns. Before you fire up that drill, make sure you’re properly protected.
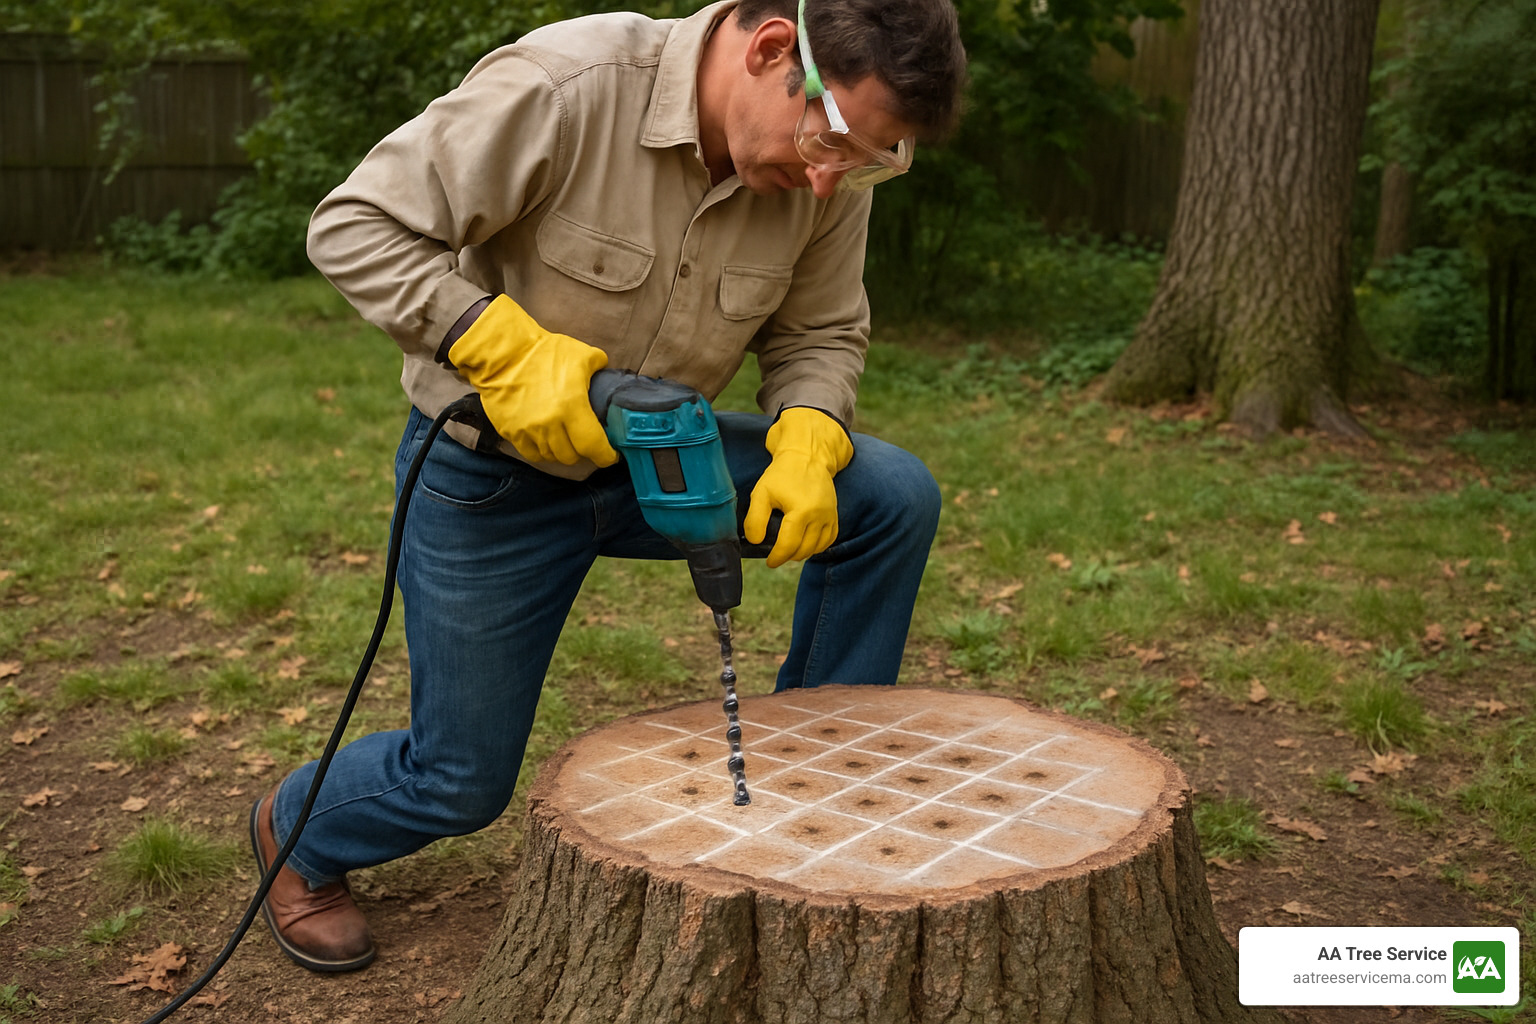
Eye protection isn’t optional—it’s essential. Flying wood chips move fast and can cause serious eye injuries. Pair this with heavy-duty gloves that provide both grip and protection from blisters and splinters. Your feet need safeguarding too, so steel-toe boots are a smart choice, offering protection from dropped tools while providing stable footing on uneven ground.
Don’t underestimate the noise. Drilling generates significant sound that can damage hearing over time, so ear protection should be part of your kit. Long sleeves protect your arms from flying debris and potential chemical contact later in the process.
Always use the auxiliary handle on your drill. This side handle gives you tremendous control and helps prevent wrist injuries if the bit suddenly catches. Your stance matters too—ensure you have stable footing before applying pressure to the drill.
Before you begin, take a few minutes to clear the area around the stump. Remove rocks, debris, and anything you might trip over. Have a brush or stick nearby to clear wood chips from holes as you drill—this prevents binding and keeps your progress steady. Position yourself comfortably to maintain control of the drill throughout the process, and keep a first aid kit accessible just in case.
With the right tools and safety gear, you’ll be well on your way to successfully preparing that stubborn stump for removal, whether you’re in coastal Massachusetts or the mountains of New Hampshire.
Step-by-Step Guide to Drilling Holes in Tree Stumps
Now that you understand the “why” and “what,” let’s dive into the “how” of drilling holes in tree stumps. This process varies slightly depending on your end goal (chemical treatment, burning, or creating a planter), but the fundamentals remain the same.
Ever stood over a stubborn stump wondering where to begin? You’re not alone. Many Massachusetts and New Hampshire homeowners find themselves puzzled at this stage. The good news is that with the right approach, even hardwood stumps like oak or maple can be conquered.
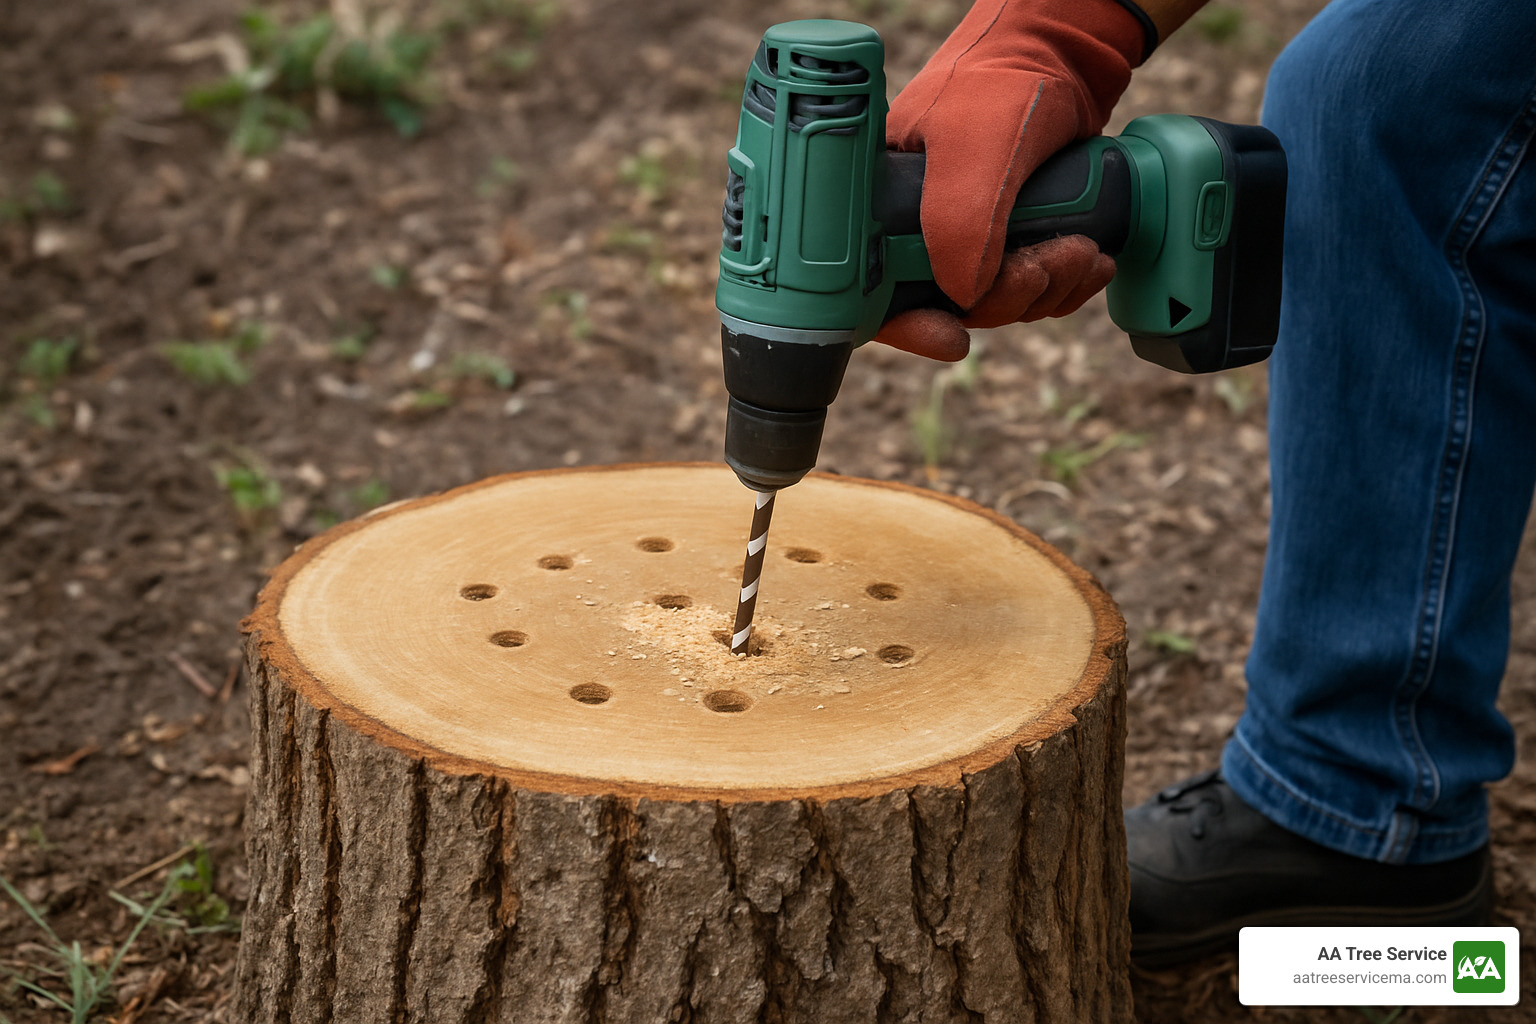
Start by cutting the stump as close to ground level as possible with a chainsaw. A lower stump means less material to remove—simple math that saves you time and effort. Next, grab your chalk or marker and create a grid pattern on the stump surface, spacing holes about 6-8 inches apart. This measured approach prevents weakening your drill bit with too many holes while ensuring enough access points for treatment.
If you’re using larger bits (3/4″ or 1″), consider starting with smaller pilot holes. “The pilot holes were a game-changer,” shared one New Hampshire homeowner. “My drill stopped fighting me once I had those guide holes in place.”
When drilling, apply steady pressure while letting the tool do the work—don’t force it. Pull the bit out frequently while it’s still spinning to clear wood chips and prevent binding. For those deep 12-inch holes, work in stages of 1-2 inches at a time. This prevents the drill from overheating and extends the life of your bits.
Pro tip: Fresh stumps are actually harder to drill than those that have seasoned for a few months. If time allows, consider waiting 2-3 months after cutting before tackling your drilling project.
How to Drill for Chemical Stump Removers
When drilling holes in tree stumps for chemical treatment, precision matters. Begin by drilling 1-inch diameter holes about 12 inches deep around the stump’s perimeter, keeping that 6-8 inch spacing we mentioned. These vertical holes become reservoirs for your stump remover.
Next, add some 45° angled holes that connect to your vertical ones. Think of these as ventilation highways that help chemicals circulate throughout the wood. For larger stumps (anything over 12 inches in diameter), don’t forget to add a grid pattern across the top surface as well.
Don’t overlook those surface roots! Drill angled holes into any visible roots extending from the stump. These root channels ensure complete treatment and prevent unwanted sprouts. Before applying any chemicals, thoroughly clear all holes using a stick or air compressor—packed wood chips will block chemical absorption.
For more information about natural options that work with drilled holes, check out our guide to Natural Stump Dissolver.
Drilling Pattern for Safe Burning
If burning is your removal method of choice (and it’s legally permitted in your Massachusetts or New Hampshire community), your drilling approach needs slight modification.
Start with one large central “chimney” hole—about 1-1.5 inches wide—drilled vertically down the center as deep as possible. This becomes your main ventilation shaft. Around this central chimney, drill holes at 30° angles that connect to it, creating a network of air channels that will feed your fire.
Add additional vertical holes around the perimeter, spacing them closer together (about 3-4 inches apart) than for chemical treatment. These chambers will hold your fuel source, whether that’s charcoal, kerosene, or another accelerant.
Safety comes first with burning. Before lighting anything, dig a 6-inch trench around the stump and clear away all flammable materials within a 5-foot radius. For best results, let your freshly drilled stump dry out for several days—moisture is the enemy of a good burn.
“I checked with my town fire department first,” recalls a Massachusetts customer. “They gave me specific guidelines and a temporary permit. The peace of mind was worth that extra phone call.”
Hollowing a Stump for a Planter
Changing that eyesore into a conversation piece? Smart choice! To create a decorative planter, begin by marking a circle 3-4 inches in from the edge of the stump. This border maintains structural integrity while you hollow out the center.
Inside your marked circle, draw a grid with lines 2-3 inches apart. For consistent depth, wrap some tape around your drill bit at your desired depth mark (typically 6-8 inches for planters). Drill holes at each grid intersection point to your marked depth.
After drilling, grab a chisel and mallet to remove wood between the holes, creating a hollow center. The drilled holes make this chiseling work much easier than starting from scratch. Don’t forget to add several 1/2-inch drainage holes through the bottom—plants hate soggy feet!
Finish by sanding any rough edges and applying a wood preservative to the interior. This extra step prevents rapid decay and extends the life of your creative garden feature. For maximum longevity, leave at least 3 inches of edge thickness to prevent cracking as the wood ages.
Whether you’re preparing for chemicals, setting up for a controlled burn, or creating garden art, drilling holes in tree stumps correctly the first time saves hours of frustration. Just remember that different wood species present different challenges—softer woods like pine drill more easily than hardwoods like oak or maple, so adjust your expectations and patience level accordingly.
After the Holes: Chemical, Fire & Natural Finish Options
Now that you’ve successfully completed drilling holes in tree stumps, you’ve got several options to finish the job. Let’s explore the most effective ways to turn those freshly drilled holes into a fully removed stump—whether you prefer chemical assistance, controlled burning, or letting Mother Nature handle the heavy lifting.
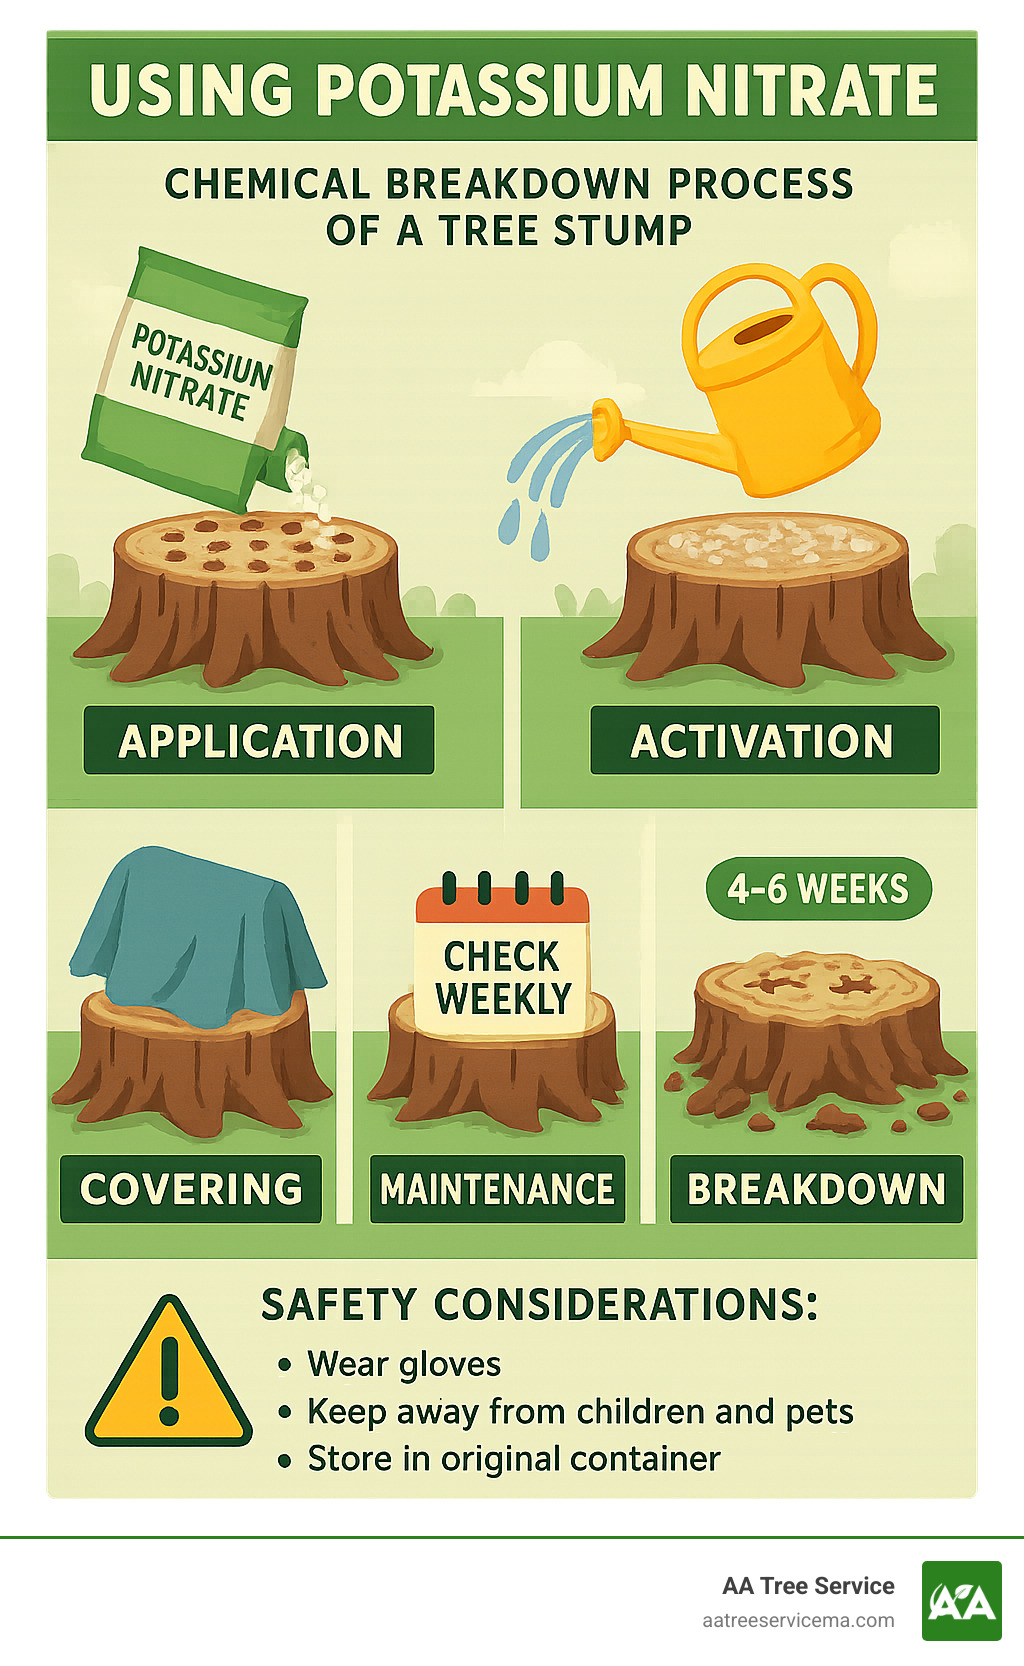
Using Potassium Nitrate Safely
That commercial stump remover you’ve seen at the hardware store? It’s primarily potassium nitrate, and it works by supercharging the natural decomposition process. Think of it as feeding an all-you-can-eat buffet to the bacteria that break down wood.
“I was skeptical at first,” shared one Massachusetts homeowner, “but after six weeks, I could literally push a screwdriver through what used to be solid oak.”
Here’s how to use it effectively and safely:
Pour about 3-4 ounces of potassium nitrate granules into each hole you’ve drilled. Add just enough water to dissolve the chemical without overflowing. Cover the entire stump with a tarp or plastic sheet—this keeps moisture in and curious critters out. Check on your stump weekly, adding water as needed to maintain moisture.
Within 4-6 weeks, that stubborn stump should transform from wood-hard to sponge-soft, making it easy to break apart with an ax or shovel.
Safety first: Potassium nitrate is classified as a hazardous substance. Always wear gloves when handling it, keep children and pets away, and store any leftover product in its original container. For detailed safety information, consult the Potassium Nitrate Hazardous Substance Fact Sheet.
If you prefer gentler alternatives, Epsom salt works similarly but takes longer (2-3 months), or try high-nitrogen lawn fertilizer which feeds decomposing organisms. Our guide to Natural Stump Dissolvers That Actually Work offers more eco-friendly options.
Turning Holes into a Controlled Burn
For New Hampshire and Massachusetts residents where local ordinances permit burning (always check first!), fire can make quick work of a stump—turning it literally to ashes. Those holes you drilled create the perfect network for a slow, controlled burn.
Wait several days after drilling to let the wood dry out. Then fill your drilled holes with charcoal briquettes. Some homeowners add a small amount of kerosene or fuel oil to help things along—but never use gasoline, which can cause dangerous flare-ups.
Create a safety perimeter around the stump using bricks, stones, or a shallow trench. Light the charcoal using kindling or fire starter, then settle in for the long haul. The stump will smolder rather than flame, typically for 12-24 hours.
“I brought out a lawn chair and made an evening of it,” one New Hampshire resident told us. “It was like having a campfire, but with the satisfaction of watching that eyesore disappear.”
Never leave a burning stump unattended. Have a water source nearby, and completely extinguish the fire before walking away. Once everything has cooled completely, remove the ash and fill the hole with soil.
Important safety warning: Stump fires can be sneaky. They can travel underground through root systems and reignite days later. Always check that the fire is completely out and follow all local fire regulations.
Letting Nature Do the Work
If you’re not in a hurry and prefer the gentlest approach, your drilled holes create the perfect environment for nature’s decomposers to get to work. This approach takes longer but requires minimal effort and zero chemicals.
Fill your freshly drilled holes with compost or rich garden soil to introduce beneficial fungi and bacteria. Add a small handful of high-nitrogen fertilizer to each hole—this feeds the microorganisms that break down wood. Keep the stump consistently moist with regular watering, and cover it with organic mulch to retain that moisture.
Pro tip: For a fascinating science project that speeds things up, try planting mushroom spawn in the holes. Oyster mushrooms are particularly effective wood decomposers, and you might even harvest some gourmet mushrooms while your stump disappears.
The natural approach typically takes 6-12 months for smaller stumps and 1-3 years for larger ones. But the wait comes with benefits: it’s environmentally friendly, requires minimal effort, and creates rich soil as the stump breaks down.
“I turned our old maple stump into a temporary planter while it decomposed,” shared a Massachusetts gardener. “By the time the stump was gone, I had a perfect spot for a new flowering shrub, already rich with organic matter.”
Whether you choose chemical assistance, controlled burning, or natural decay, those precisely drilled holes are the key to success. And remember, if you decide the DIY approach isn’t for you, AA Tree Service offers professional Stump Removal Service throughout Massachusetts and New Hampshire.
Safety, Regulations & Troubleshooting in MA & NH
Let’s face it—drilling holes in tree stumps isn’t just about having the right drill. There’s a whole world of local regulations and potential hiccups to steer, especially here in Massachusetts and New Hampshire. I’ve seen plenty of homeowners start this project with enthusiasm only to hit unexpected roadblocks. Let’s make sure that doesn’t happen to you!
Local Regulations to Consider
Before you fire up that drill or certainly before you light any fires, take a moment to check what’s allowed in your neck of the woods. Massachusetts and New Hampshire towns each have their own rules about stump removal methods.
Burning permits are a must-have if you’re planning the fire route. In Massachusetts, open burning season typically runs from January 15 to May 1, but don’t assume that’s true for your town—some places prohibit burning entirely, especially if you’re in a densely populated area. New Hampshire is generally more permissive with burning, but you’ll still need to get the local fire warden’s approval first.
Chemical treatments might seem straightforward (just pour and wait, right?), but be mindful if your property is near wetlands, streams, or water sources. What seeps into your soil can travel further than you might expect. Most stump removal chemicals are available over the counter, but using them responsibly matters.
Wildlife considerations might not be top of mind, but that old stump could be home to beneficial creatures. Take a quick look for signs of inhabitants before you start your removal project. In some cases, certain protected species might have taken up residence.
Primary Keyword Troubleshooting: Drilling Holes in Tree Stumps When the Drill Binds
“I thought my drill was broken!” That’s what one Massachusetts homeowner told me after struggling with a particularly stubborn maple stump. The truth is, drilling holes in tree stumps often leads to binding—where your bit gets stuck and the drill suddenly wants to twist your wrist instead of turning the bit.
When your drill binds (and trust me, it probably will), don’t panic. Keep the drill running while slowly pulling back to clear those wood chips that are causing the jam. This simple withdrawal technique solves most binding issues without strain or damage.
If you’re completely stuck, switch to reverse briefly. The bit will usually free itself, allowing you to continue with more controlled pressure. For particularly difficult wood, applying a bit of beeswax or even regular candle wax to the bit reduces friction dramatically.
The staged drilling approach works wonders too. Instead of trying to drill 10 inches at once, go down 1-2 inches, pull out completely to clear chips, then continue. It takes slightly longer but saves your equipment and your patience.
Dull bits bind more easily than sharp ones. If you’re struggling more with each hole, it might be time for a new bit rather than applying more muscle.
What If the Drill Still Can’t Cut It?
Sometimes, despite your best efforts, that stump just won’t cooperate. Don’t feel bad—some New England hardwoods can be incredibly dense, especially older growth oaks and maples.
Your first option is upgrading your equipment. Most hardware stores in Massachusetts and New Hampshire offer daily rentals of professional-grade drills. Look specifically for a right-angle “Hole Hawg” drill—these beasts are designed for exactly this kind of high-torque application and can power through even the toughest wood.
Bit selection matters too. If spade bits aren’t cutting it (literally), try a ship auger bit which performs better in tough wood. Self-feeding auger bits have an aggressive tip that helps pull the bit through the wood, reducing the effort you need to apply.
For particularly large or stubborn stumps, sometimes it’s worth reconsidering your approach entirely. Professional stump grinding might save you hours of frustration and potential equipment damage. Our Stump Removal Service can handle even the most challenging stumps quickly and safely—often finishing in an hour what might take a homeowner several weekends.
If the stump is relatively small, you might consider digging around it and removing it manually, or simply covering it with soil and turning it into a raised garden bed. Sometimes working with nature rather than against it yields the best results.
When all is said and done, every stump is different. What worked for your neighbor’s pine might not work for your oak. Don’t hesitate to give us a call for a free same-day quote if you find yourself in over your head. With over 20 years of experience handling Massachusetts and New Hampshire’s toughest trees, we’ve seen (and solved) it all.
Frequently Asked Questions about Drilling Holes in Tree Stumps
How long before chemicals soften the stump?
When drilling holes in tree stumps and applying chemicals, patience becomes your greatest ally. Commercial stump removers containing potassium nitrate typically need 4-6 weeks to work their magic, softening the wood enough to break it apart. If you’ve chosen natural alternatives like Epsom salt, expect to wait a bit longer—usually 2-3 months before seeing significant results.
Your timeline will vary based on several factors. Large oak or maple stumps in Massachusetts can take considerably longer than smaller pine stumps. As one New Hampshire homeowner told us, “I expected results in a month with my maple stump, but it took closer to eight weeks before I could break it apart easily.”
Weather plays a significant role too. Summer applications work faster than those applied during New England’s cooler months when bacterial and fungal activity naturally slows down. To speed things along, keep the stump consistently moist and consider reapplying chemicals every 4-6 weeks until the wood becomes soft and spongy enough to break apart with an ax.
What drill power rating do I really need?
This is perhaps the most common question we hear from Massachusetts and New Hampshire homeowners attempting to drill stumps themselves. The frustration of an underpowered drill can quickly turn this project from satisfying to maddening.
For drilling holes in tree stumps effectively, you’ll need:
- Corded drills: Minimum 800W with variable speed control
- Cordless drills: At least 18V with a high-torque brushless motor
These specifications represent the bare minimum, however. For those stubborn oak and maple stumps common throughout New England, you’ll appreciate more muscle:
“My standard 18V Ryobi couldn’t make a dent in my oak stump,” shared one Massachusetts customer. “I ended up renting a right-angle drill for the weekend, and it made all the difference.”
If you’re tackling a large stump, consider upgrading to a heavy-duty 1000W+ corded drill with auxiliary handles or a professional-grade 20V+ cordless with 4.0Ah or larger batteries. The investment in renting proper equipment for a day will save you hours of frustration and potentially a burned-out motor on your regular drill.
Is burning legal in my Massachusetts or New Hampshire town?
Burning regulations vary significantly between towns in Massachusetts and New Hampshire, and they’re strictly enforced for good reason. Before you light up that stump, understand your local rules.
In Massachusetts, open burning season typically runs from January 15 to May 1, and permits are required from your local fire department. Many urban and suburban areas prohibit open burning entirely, while others allow it only between 10 AM and 4 PM with proper permits. One Middlesex County homeowner learned this the hard way: “I thought a small stump fire wouldn’t be noticed—ended up with a $300 fine instead.”
New Hampshire residents must obtain permits from their local fire warden or fire department for all open burning. These regulations tighten considerably during dry seasons, and some towns have specific ordinances addressing stump burning.
Before attempting to burn a stump after drilling holes in tree stumps, take these essential steps:
Contact your local fire department for current regulations, obtain any necessary permits, and notify officials on the day you plan to burn. Never attempt burning during dry or windy conditions, and always keep a garden hose or fire extinguisher nearby.
Even with a permit, you remain responsible for controlling the fire and liable for any damage it causes. When in doubt, chemical treatments or professional removal services provide safer alternatives for most residential properties in Massachusetts and New Hampshire.
Conclusion & Next Steps
Drilling holes in tree stumps marks the beginning of your journey toward a stump-free yard. Whether you’re a DIY enthusiast or simply looking to save on professional removal costs, the techniques we’ve covered offer practical solutions for Massachusetts and New Hampshire homeowners.
Throughout this guide, we’ve walked through everything you need to know—from selecting the right equipment to choosing the most appropriate removal method for your situation. The satisfaction of tackling this project yourself can be immensely rewarding, especially when you see that eyesore finally disappear from your landscape.
Success comes down to a few key principles: using sufficient power in your drill, creating the right pattern of holes, choosing the appropriate removal method for your situation, and—perhaps most importantly—having patience as the process unfolds. Tree stumps took years to grow, and while we can certainly accelerate their removal, even the fastest methods require some time to work their magic.
If you’ve followed along and feel ready to tackle your stump, that’s fantastic! Many homeowners across Massachusetts and New Hampshire have successfully removed stumps using these methods. However, if you’re looking at a particularly large stump, dealing with hardwood like oak or maple, or simply prefer to leave it to professionals, that’s perfectly understandable too.
At AA Tree Service, we’ve spent over 20 years helping homeowners throughout Massachusetts and New Hampshire reclaim their yards from unwanted stumps and trees. Our comprehensive tree removal services include professional stump grinding that can eliminate even the most stubborn stumps in a matter of hours rather than weeks.
What sets us apart is our commitment to customer satisfaction, backed by free same-day quotes, 24/7 emergency availability, and a team of licensed professionals equipped with state-of-the-art equipment. We understand that every property is unique, which is why we provide personalized solutions rather than one-size-fits-all approaches.
Whether you choose to tackle stump removal yourself or call in the experts, the important thing is that you don’t have to live with that unsightly stump forever. Your yard has potential waiting to be open uped, and removing that stump is often the first step toward creating the outdoor space you’ve been dreaming of.
For all your tree care needs beyond stump removal—from pruning to complete tree removal and land clearing—we’re here to help make your property the best it can be. Because at the end of the day, your satisfaction and the beauty of your landscape are what matter most.
