Why Tree Stump Removal Chemicals Are Your Best DIY Option
Tree stump removal chemicals offer Massachusetts and New Hampshire homeowners a simple way to tackle stubborn stumps without renting expensive equipment or breaking their backs with shovels.
Quick Answer for Chemical Stump Removal:
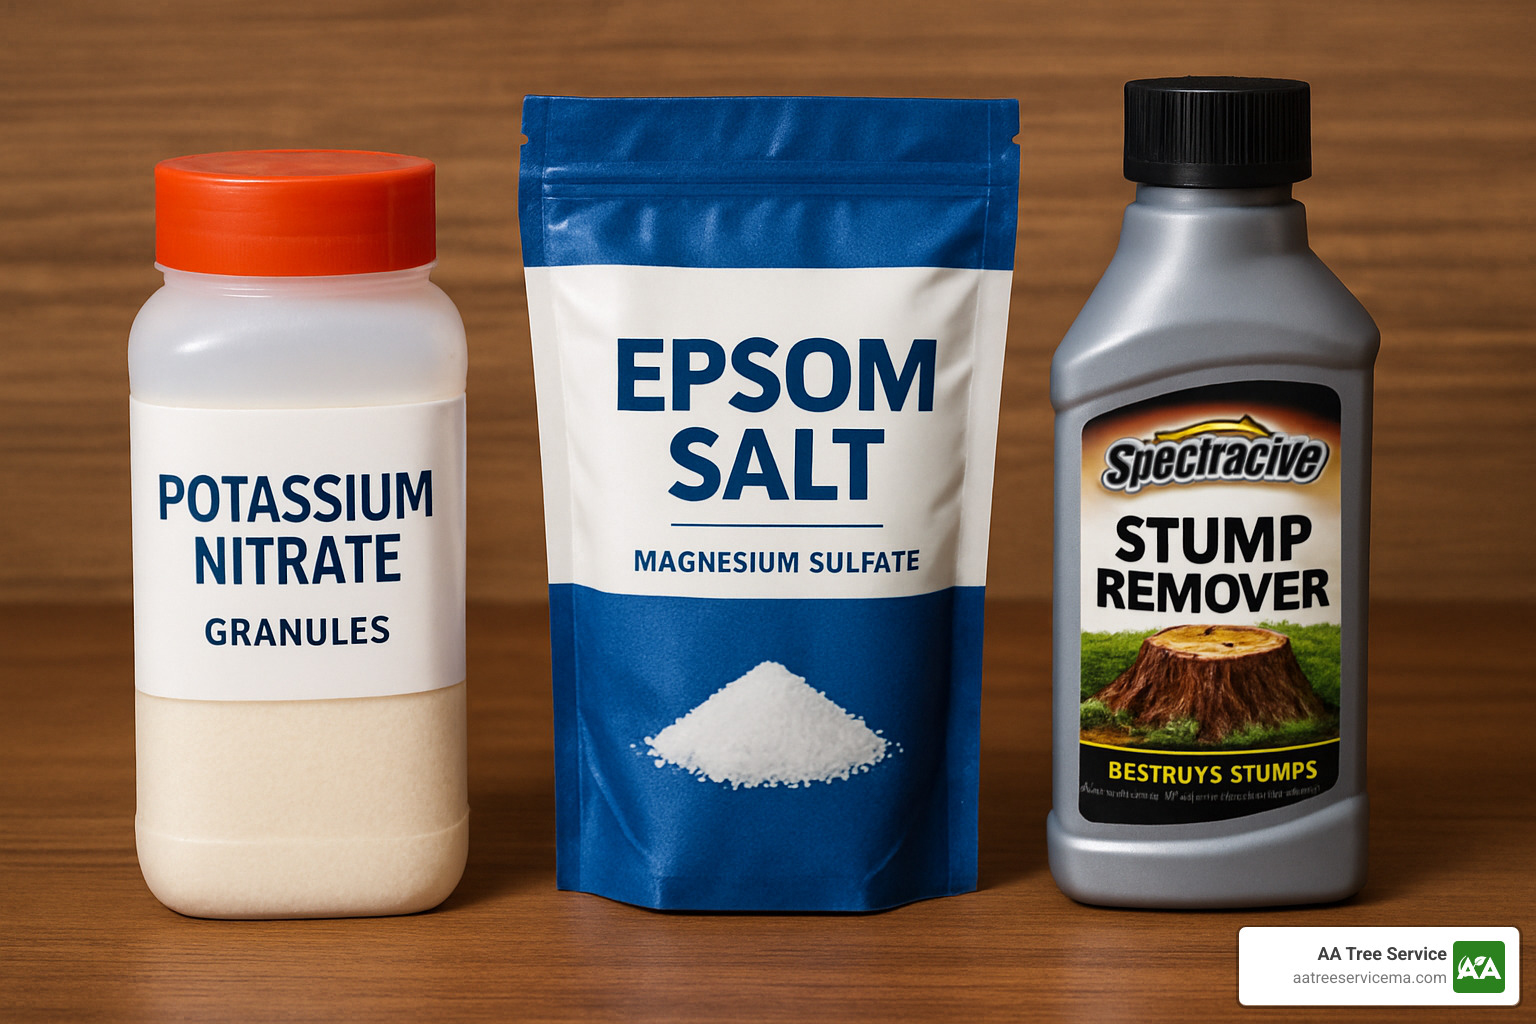
– Most Common Chemicals: Potassium nitrate, Epsom salt, rock salt
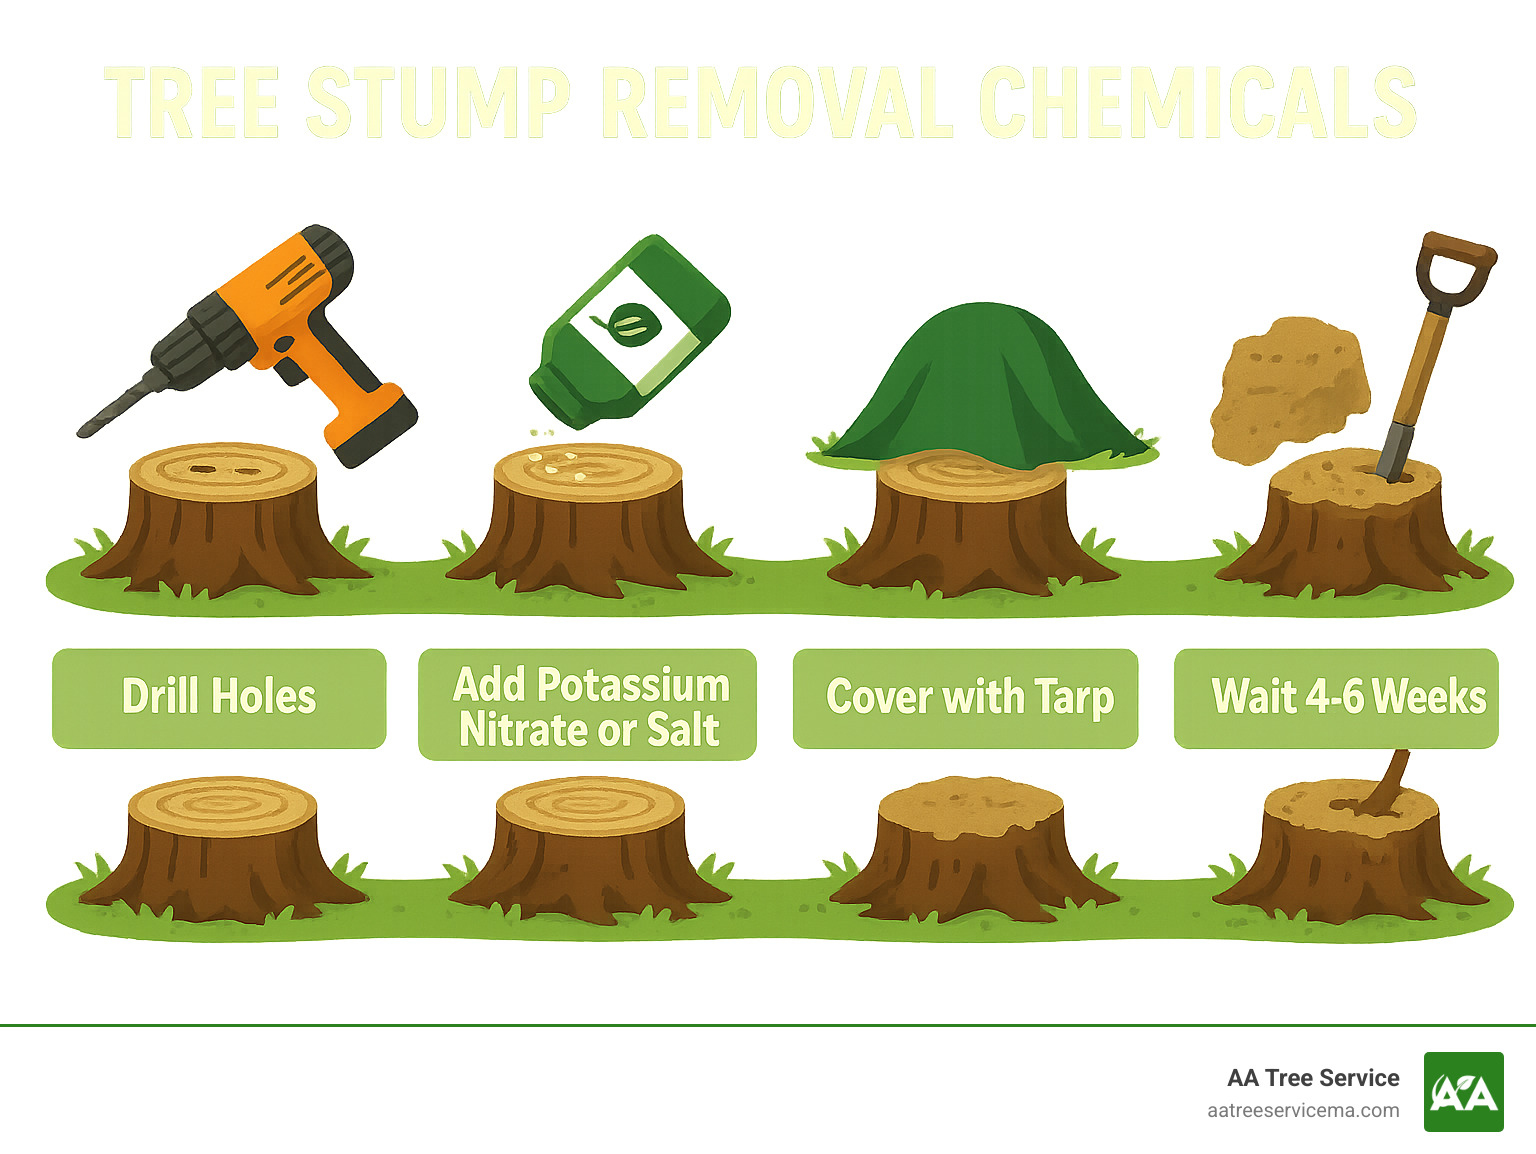
– Application Method: Drill 1-inch holes, fill with chemicals, cover with tarp
– Timeline: 4-6 weeks for softening, up to 1 year for complete decay
– Cost Range: $6-20 for chemicals vs $100-400+ for professional grinding (average internet pricing data)
– Best Results: Works fastest on stumps cut 18+ months ago
That old stump has been sitting in your yard for who knows how long, and you’ve decided it’s finally time to say goodbye. Maybe you’re tired of mowing around it, or perhaps you’re planning new landscaping and need the space.
Chemical stump removal works by accelerating the natural decay process. Instead of waiting years for a stump to rot on its own, these products feed wood-eating fungi and break down the tough fibers that hold stumps together.
The process is straightforward: drill holes, add chemicals, wait patiently. Most homeowners see results in 4-6 weeks when the stump becomes soft and spongy enough to break apart with an axe or shovel.
The reality? Chemical removal isn’t instant like stump grinding, but it costs a fraction of the price and doesn’t require heavy machinery that can damage your lawn.
Similar topics to tree stump removal chemicals:
– drilling holes in tree stumps
– natural stump dissolver
– local stump grinding
Understanding Tree Stump Removal Chemicals
If you’ve ever wondered how a simple powder can turn a rock-hard stump into something you can kick apart with your boot, you’re about to find some fascinating science. Tree stump removal chemicals work by giving Mother Nature a serious boost – they speed up what would normally take years into a process that happens in just weeks.
Think of a tree stump like a fortress made of two main materials: lignin and cellulose. These tough compounds made your tree strong enough to weather decades of New England storms. When a tree dies, fungi and bacteria naturally start breaking down these fortress walls, but they work at nature’s pace – which means you’d be waiting about 3-7 years for that stump to rot away on its own.
The real magic happens through microbial action. Picture millions of tiny wood-eating organisms that are just waiting for the right conditions to throw a decomposition party. Chemical stump removers create the perfect environment for these microbes by providing nutrients, oxygen, and moisture.
What Counts as a “Chemical Stump Remover”?
Not all stump removal chemicals are created equal. The three most effective types each work differently, so choosing the right one depends on your timeline and budget.
Potassium nitrate is the heavyweight champion of stump removal. This compound acts like an oxygen delivery system, feeding wood-decaying bacteria exactly what they need to work overtime. Most commercial stump removers use potassium nitrate because it consistently delivers faster results than other options.
Epsom salt takes a gentler approach that’s kinder to your wallet and your garden. This magnesium sulfate works by pulling moisture out of the wood while feeding decay organisms. It’s particularly popular with Massachusetts and New Hampshire homeowners who have flower beds or vegetable gardens nearby.
Rock salt is your budget-friendly option, though it requires more careful application. Regular table salt or road salt will dehydrate the stump and create conditions that promote faster decay. Just remember that salt can damage nearby grass and plants if you get too generous with it.
How Do These Compounds Break Down Wood?
The breakdown process involves three different mechanisms working together like a well-coordinated demolition crew.
Oxidation is what happens when potassium nitrate floods the wood with oxygen. Think of it like adding extra air to a campfire – suddenly all those wood-eating bacteria have the fuel they need to work much faster. This process breaks down lignin and cellulose at the molecular level.
Hygroscopic desiccation is the scientific term for “sucking out all the water.” Salt-based removers pull moisture from wood cells, causing them to shrink and crack. These cracks create highways for decay organisms to travel deeper into the stump.
Nitrogen-boosted rot is the biological component that really gets things moving. Most tree stump removal chemicals are packed with nitrogen, which acts like fertilizer for fungi and bacteria. These microorganisms multiply rapidly and consume the wood structure from the inside out.
The whole process typically takes 4-6 weeks in Massachusetts and New Hampshire’s climate, though winter applications may take longer due to slower microbial activity in cold weather.
Step-by-Step Guide: Applying Tree Stump Removal Chemicals in MA & NH

Now let’s get into the practical steps for applying tree stump removal chemicals effectively. This process requires patience and attention to detail, but it’s straightforward enough for any homeowner to tackle.
The key to success is proper preparation and consistent application. Chemical stump removal works best when you create optimal conditions for the chemicals to penetrate the wood and accelerate decay.
1. Site Prep & Safety Gear
Getting ready to apply tree stump removal chemicals might seem straightforward, but taking a few minutes to prepare properly can save you from headaches down the road.
Safety gear isn’t optional when you’re working with these chemicals. You’ll want safety glasses before you start – those wood chips from drilling have a sneaky way of flying right toward your face. Work gloves are essential too, since potassium nitrate and salt-based products can irritate your skin, especially if you have any small cuts on your hands.
Long sleeves and pants might feel like overkill on a warm day, but they’ll protect you from both chemical splashes and those inevitable splinters.
Keeping kids and pets safe requires a bit more planning. Once you’ve applied the chemicals, that stump becomes off-limits for at least 48 hours. Potassium nitrate might sound harmless, but it can cause real irritation to eyes and skin, especially for curious little ones who like to touch everything.
Consider putting up some temporary fencing or at least marking the area clearly with bright tape. Your dog won’t understand why that interesting new smell is suddenly forbidden territory, so a physical barrier works better than hoping they’ll remember your warnings.
Local regulations in Massachusetts and New Hampshire are generally pretty relaxed about chemical stump removal on private property. However, if your stump sits anywhere near wetlands, streams, or conservation areas, it’s worth a quick call to your local conservation commission.
2. Drilling & Filling the Stump
Getting the drilling pattern right makes all the difference between tree stump removal chemicals that work effectively and chemicals that just sit on the surface doing nothing.
Your drill is about to become your best friend for this project. A 1-inch auger bit paired with a powerful drill gives you the holes you need to create chemical reservoirs deep in the wood. If you’ve got a smaller stump, your cordless drill might handle the job just fine. But for those stubborn oak or maple stumps that seem harder than concrete, you’ll want a corded drill or might even need to rent a manual auger.
Start by creating vertical holes across the entire stump surface. Space these holes about 3-5 inches apart – think of it like a grid pattern that covers the whole top. Drill down as deep as your bit allows, ideally 6-12 inches. These vertical holes become little chemical reservoirs that hold your stump remover right where it needs to work.
Here’s where most people stop, but you’re going to take it one step further. Drill 45-degree angled holes that connect with your vertical holes. This creates an underground highway system that helps chemicals spread throughout the entire stump structure. The angled holes also provide ventilation, which keeps the decay process moving along nicely.
Now comes the satisfying part – filling those holes with your chosen chemicals. Pour granules slowly into each hole, filling them about three-quarters full. Don’t pack the chemicals down like you’re loading a cannon. You want some breathing room for the chemical reaction to happen properly.
Add just a splash of water to each hole to help dissolve the chemicals and kickstart the penetration process. Think of it as giving your chemicals a head start on their journey into the wood fibers.
3. Moisture, Cover, and Patience
Once you’ve drilled your holes and filled them with tree stump removal chemicals, the waiting game begins – but it’s not a passive process. Getting the moisture balance right can mean the difference between success and failure.
Tarp sealing is your best friend here. Think of it as creating a little greenhouse for decay. Cover the entire stump with a heavy-duty waterproof tarp, making sure to secure the edges with rocks, bricks, or landscape stakes. You want this seal tight enough to keep rain from washing away your chemicals, but the tarp also traps moisture that helps the breakdown process.
The 4-6 weeks softening period tests every homeowner’s patience. During these first weeks, peek under your tarp every week or two. You’re looking for encouraging signs: the wood starting to darken, soft spots appearing when you poke with a screwdriver, and maybe some fuzzy fungal growth.
That spongy texture you’ll eventually feel means the chemicals are doing their job, breaking down those tough wood fibers from the inside out.
Here in Massachusetts and New Hampshire, winter versus summer timelines can be dramatically different. If you start your chemical treatment in late fall, don’t expect much action until spring temperatures warm up the soil and stump. Cold weather basically puts the decay process on pause.
Summer applications are where you’ll see the magic happen faster. The combination of warm temperatures, active soil biology, and consistent moisture can have your stump feeling like a wet sponge in just four weeks. Plan your project timing accordingly – starting in May or June gives you the best chance of seeing results before winter sets in.
4. Checking Progress & When to Re-apply
After 4-6 weeks of waiting, you’re probably eager to see if your tree stump removal chemicals are actually working. The good news is that successful treatment shows clear signs – you just need to know what to look for.
The most reliable test is checking for spongy texture in the wood. Grab a screwdriver or sturdy knife and poke it into different areas of the stump. If the chemical treatment is working, the blade should penetrate easily into wood that feels soft and mushy. Hard, resistant wood after 6-8 weeks means you’ll need to drill more holes and add another round of chemicals.
Don’t be alarmed if you notice fungal growth sprouting from your stump – those white, thread-like structures or small mushrooms are actually your best friends in this process. These fungi are the hardworking decomposers that break down the tough wood fibers. Let them do their job rather than scraping them off.
A distinct rotten odor often develops as the stump decomposes, especially during warm, humid weather here in Massachusetts and New Hampshire. While it’s not exactly pleasant for backyard barbecues, this smell tells you the decay process is happening exactly as it should. The odor typically becomes less noticeable as decomposition progresses.
Scientific research on stump decay confirms that potassium nitrate treatments can make stumps soft enough for manual removal within 4-6 weeks when conditions are right. However, factors like stump size, wood species, and weather can extend this timeline significantly.
If your stump still feels rock-hard after two months, don’t give up. Drill additional holes in untreated areas, add more chemicals, and reset your patience clock. Sometimes older, larger stumps need multiple treatments before they surrender to the decay process.
Comparing Chemical, Mechanical, and Other Stump Removal Methods
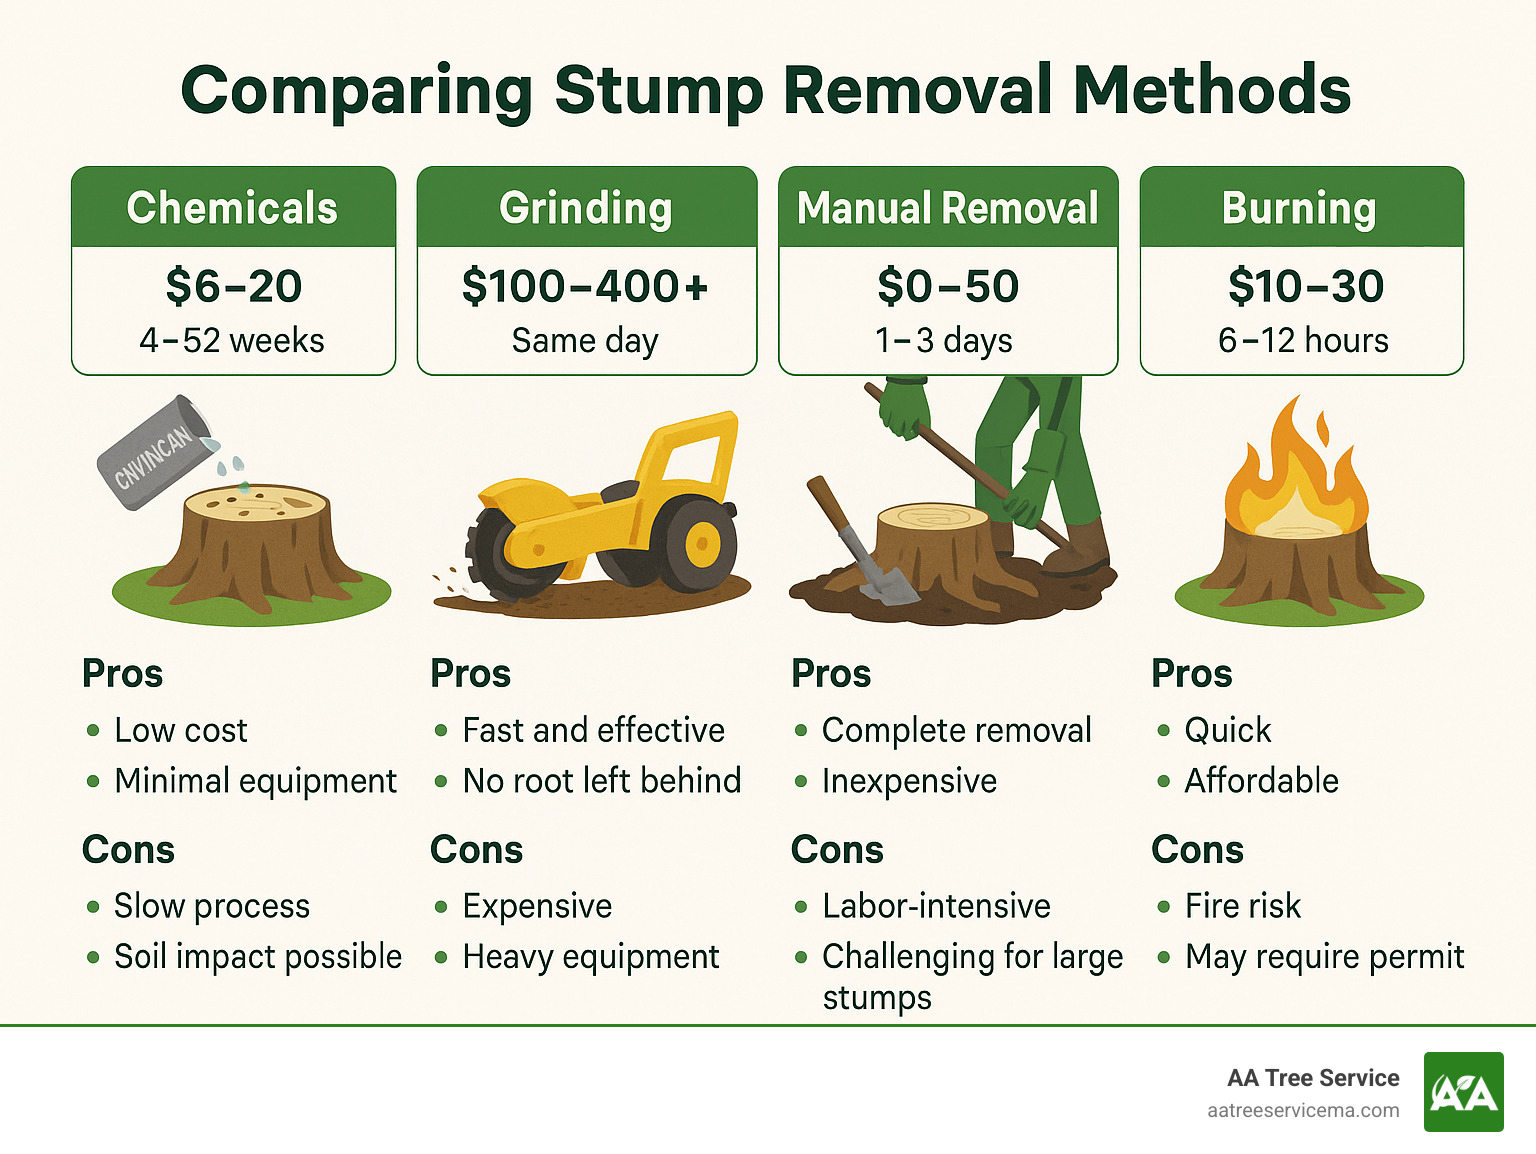
Tree stump removal chemicals represent the most budget-friendly approach, with costs ranging from just $6-20 for materials based on internet pricing data. The trade-off? You’ll need patience, as the process takes anywhere from 4 weeks to a full year depending on stump size and New England weather conditions.
Professional stump grinding sits at the opposite end of the spectrum. Average costs range from $100-400+ according to industry data, but you get same-day results. The downside is potential lawn damage from heavy equipment and the need for adequate access to your stump.
Manual removal appeals to the truly determined DIY enthusiast. Tool rental might cost $0-50, and you could have that stump out in 1-3 days of serious labor. Just remember – what looks manageable above ground often has a massive root system below.
Burning offers a middle ground at $10-30 for fuel, requiring 6-12 hours of careful monitoring. It’s effective but comes with serious legal and safety considerations in Massachusetts and New Hampshire, where fire restrictions are common.
Pros & Cons of Chemical Methods
The beauty of chemical stump removal lies in its simplicity and accessibility. You don’t need to rent expensive equipment, hire professionals, or develop superhuman strength. It’s perfect for homeowners who want to tackle multiple stumps without breaking the bank or their backs.
The gentle approach means minimal disruption to your landscape. While a grinding machine might tear up your lawn and damage nearby plants, chemicals work quietly underground.
Patience becomes your biggest challenge with chemical methods. Unlike the instant gratification of professional grinding, you’re working with biological processes that can’t be rushed. Winter applications in our New England climate might not show results until spring thaw allows decay to resume.
Salt damage poses a real risk if you get heavy-handed with rock salt applications. Over-salting can create dead zones in your lawn where nothing grows for months. This is why many experienced homeowners prefer Epsom salt near valuable plantings.
Environmental & Legal Considerations in MA & NH
Before you start drilling holes and pouring chemicals, take a moment to understand the legal landscape in Massachusetts and New Hampshire.
Wetland buffer zones extend 100 feet from any stream, pond, or wetland area. If your stump falls within this zone, you’ll likely need approval from your local conservation commission before applying any tree stump removal chemicals.
Fire restrictions affect your options if you plan to burn the softened stump after chemical treatment. Most Massachusetts and New Hampshire communities require permits for any open burning, and seasonal restrictions during dry periods can shut down burning entirely.
Treated wood disposal requires some consideration. Don’t turn that chemically treated stump into mulch for your vegetable garden or add it to your compost pile. Most municipal yard-waste programs accept treated wood, but it’s worth confirming with your local waste-management provider.
Choosing the Right Tree Stump Removal Chemical
Walking down the garden center aisle, you’ll find yourself staring at several options for tree stump removal chemicals. The good news? You really only need to understand three main types to make the right choice for your Massachusetts or New Hampshire property.
Potassium nitrate is the speed demon of stump removal. If you’re in a hurry to get that eyesore out of your yard, this is your best bet. Commercial products work within 4-6 weeks under decent conditions, which is lightning-fast compared to waiting years for natural decay. The trade-off? You’ll pay more upfront, typically $15-20 for a container that treats one large stump.
Epsom salt wins the popularity contest with budget-conscious homeowners. A 4-pound bag costs just $3-5 at most hardware stores and can handle several small to medium stumps. It takes longer than potassium nitrate, but your wallet will thank you.
The branded vs DIY debate comes down to convenience versus cost. Commercial stump removers take the guesswork out of mixing ratios and give you foolproof instructions. DIY approaches using basic chemicals from the hardware store save money but require a bit more research on your part.
Common Mistakes to Avoid
Here’s where I save you from the headaches that other homeowners have already suffered through.
Over-salting is like over-fertilizing your lawn – more isn’t better, it’s just more expensive and potentially damaging. Some folks think dumping extra chemicals will speed things up, but biology doesn’t work that way.
Skipping the watering schedule kills your results before they start. Dry chemicals sitting in dry holes accomplish about as much as a chocolate teapot. Those chemicals need moisture to dissolve and penetrate the wood fibers.
Forgetting about nearby plant roots can turn your stump removal project into a landscaping disaster. Tree roots from your prized maple might extend under that old stump you’re treating. Keep your chemical applications focused on the stump itself.
Impatience might be the biggest enemy of successful chemical stump removal. This isn’t like using a chainsaw where you get instant results. The biological processes involved take time, and no amount of wishful thinking will speed them up.
Budget Checklist & Buying Tips
Average costs for tree stump removal chemicals range from $6-20 depending on what you choose and where you shop (internet pricing data). Potassium nitrate products cost more upfront but deliver faster results. Epsom salt gives you the best bang for your buck, especially if you’re dealing with multiple stumps or working on a tight budget.
Planning quantities prevents those annoying mid-project trips to the store. A typical 12-inch diameter stump needs about 1-2 pounds of granular product for effective treatment. Got a monster stump? You might need 3-4 pounds to get the job done right.
The bottom line? Choose based on your timeline and budget. Need it gone quickly? Go with potassium nitrate. Working with multiple stumps on a budget? Epsom salt is your friend. Either way, you’ll spend a fraction of what professional grinding would cost.
Frequently Asked Questions about Tree Stump Removal Chemicals
When homeowners in Massachusetts and New Hampshire start researching tree stump removal chemicals, the same questions come up again and again. Let’s tackle the three most important ones.
How soon can I replant after chemical stump removal?
You’ll want to wait at least 6 months after the stump has completely decomposed before putting new plants in that spot.
Chemical residues stick around longer than you might think, especially if you used salt-based products. These can mess with your soil’s pH and make it tough for new plants to get established.
Test your soil pH before replanting – it’s a simple step that can save you from watching expensive new plants struggle or die. If the pH is off, add some compost to help neutralize any remaining chemicals.
For those “I need something planted there yesterday” situations, your best bet is to remove the treated soil completely and replace it with fresh topsoil mixed with compost.
Are potassium-nitrate stump products safe for pets once applied?
Potassium nitrate becomes much safer once it’s absorbed into the wood and you’ve got everything covered properly, but don’t let your furry friends near treated stumps for at least 48 hours after application.
The biggest risk comes from those granular chemicals before they’re absorbed. Dogs and cats can get the stuff on their paws, then lick it off during grooming.
Once the chemicals soak in and you’ve covered the stump with a tarp, the danger drops significantly. The chemicals are now locked inside the wood structure where curious noses and paws can’t easily reach them.
Can I use chemical removers on maple, oak, and pine equally?
Different wood species respond at totally different speeds, and this can make or break your timeline expectations.
Pine stumps are the speed demons of chemical removal. These softwoods typically start getting spongy in 4-6 weeks because their wood structure is less dense and the chemicals penetrate faster.
Oak stumps are the marathon runners – they can take 8-12 weeks or even longer to show real progress. Oak is incredibly dense and tough, which is great when it’s a living tree but frustrating when you’re trying to get rid of the stump.
Maple falls right in the middle of the timeline, usually responding within 6-8 weeks under good conditions.
Here’s a pro tip: older, drier stumps absorb chemicals better regardless of the species. A two-year-old oak stump will often respond faster than a freshly cut pine stump because the wood has already started breaking down naturally.
Conclusion
Tree stump removal chemicals offer Massachusetts and New Hampshire homeowners a smart, budget-friendly way to tackle those stubborn stumps without breaking the bank or your back. You’ll need patience – but when you’re paying $6-20 instead of hundreds for professional grinding, waiting a few weeks suddenly seems pretty reasonable.
Here at AA Tree Service, we’ve spent over 20 years helping homeowners across Massachusetts and New Hampshire deal with tree problems of all sizes. We know that sometimes the DIY chemical approach is exactly what you need – especially for that single annoying stump that’s been mocking you every time you mow the lawn.
But let’s be honest about when chemicals make sense and when they don’t. Chemical removal works beautifully when you’re dealing with smaller stumps, you’re not in a rush, and you enjoy the satisfaction of a DIY project. It’s perfect for homeowners who want to save money and don’t mind checking progress every few weeks.
However, if you’re staring down multiple large stumps, planning new landscaping next month, or dealing with a stump that’s interfering with your property’s drainage, our professional grinding services deliver same-day results that chemicals simply can’t match.
We’ve learned that the best stump removal method isn’t one-size-fits-all – it depends on your timeline, budget, and specific situation. That’s why we offer 24/7 emergency services and free same-day quotes throughout our service areas.
Whether you decide to go the chemical route or prefer professional removal, we’re here to help with honest advice and reliable service. Our customer satisfaction guarantee means you can trust us to recommend what’s truly best for your situation.
Ready to finally get rid of that stump? Check out our comprehensive tree removal services or contact us for a free quote. We’ll help you choose the approach that makes the most sense for your yard, your timeline, and your wallet.
After all, life’s too short to keep mowing around stumps – whether you remove them with chemicals or let us grind them out, the important thing is getting your yard back to looking its best.
